Production years:
- 1964 -1967 “blackface” circuits AA763, AB763, AB868 (CBS)
- 1967 -1977 “silverface” circuits AB763, A1172 and A1270
- 1977-1979 “silverface” circuit with Push-pull volume boost.
Tube layout
AA763/AB763 Tube layout (Seen from behind, V1 is to the right side)
- V1 12ax7 = Preamp normal channel
- V2 12ax7 = Preamp vibrato channel
- V3 12at7 = Reverb send
- V4 12ax7 = 1/2 Reverb recovery and 1/2 gain stage for vibrato channel
- V5 12ax7 = Vibrato
- V6 12at7 = Phase inverter
- V7 6V6 = Power tube #1
- V8 6V6 = Power tube #2
- V9 GZ34 = Rectifier tube

Summary
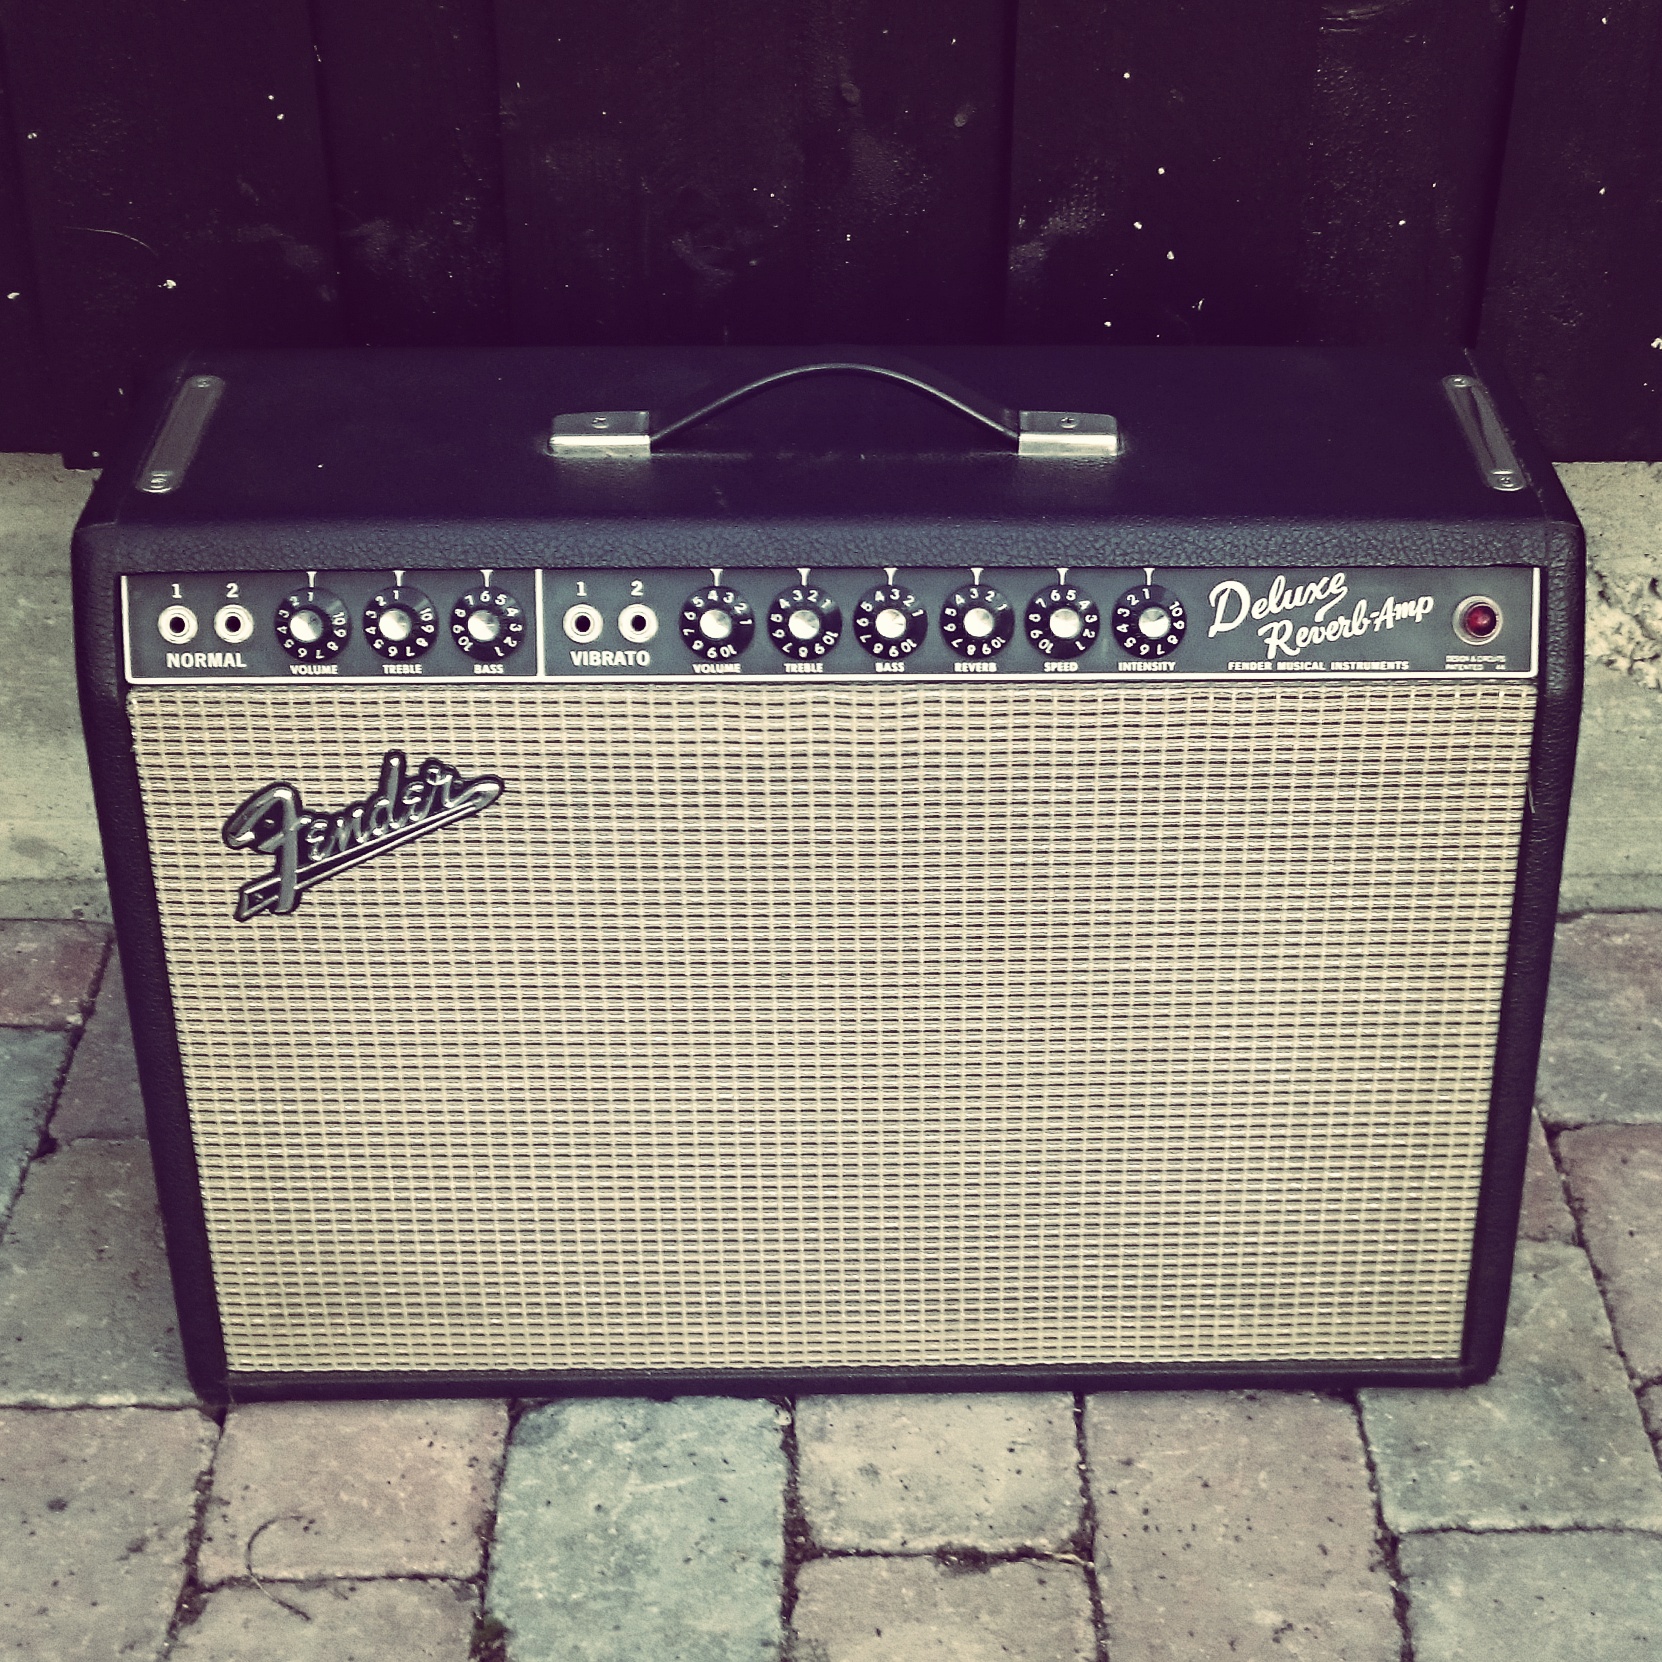
The Deluxe Reverb 1×12″ has for decades been one of the most popular amps among all Fender amps, and its popularity is still growing as the demand for low wattage tube amps increases. The combination of size, weight and performance makes the Deluxe Reverb a true road warrior on gigs and practise. Since the year 2002 we have observed, by monitoring the amp market on US ebay, that low wattage amps have increased dramatically in popularity. Nowadays (2012) you can score a big 6L6 vintage Fender amp for the same price as a Deluxe Reverb or Princeton Reverb. We find it irrational. The PA was invented long time before that and guitar tones containing fuzz and distortion have been around since the sixties-seventies. Why has the desire for low wattage amps with 20-25 watts of tube power come up so late?
Both the Deluxe Reverb (DR) and Princeton Reverb (PR) “survived” the CBS silverface periods with minor changes. Many people consider the silverface amps just as sonically good as the blackface models. Being almost a blackface amp with a new faceplate (wrong for collectors), the silverface models became popular value-for-the-money amps. Collectors hunt the blackface models and players hunt the silverface for its quality and price. The push/pull volume boost was installed in 1977 by CBS. The circuit was then significantly different from the blackface circuit. Hence, the price for this amp is lower than its predecessors.
The DR is a small/medium-sized amp with an ability to deliver both sparkling clean tones and low wattage breakup at 22W with 6V6 tubes and relatively small transformers (power and output). It has found its way in to more recording studios, clubs and bars than any other Fender amp. It has met many players’ expectations. It is just powerful enough to cut through in practise in a band with a drummer and, unlike some bigger amps, it will reach its sweet spot at a reasonable volume. It has the typical blackface 60’s sparkle with a scooped clean sound just like the bigger Fender brothers, just with more smooth breakup, sag and compression. The smaller brother Princeton Reverb is rolling off more top frequencies and breaks up earlier with more warmth producing a brownface type of tone. It will not cut through the mix as easily as the stingin tone of the Deluxe Reverb.
In general we don’t recommend the mods on this page that increase the power and clean headroom unless you are playing your amp at gigs on medium/large stages and you need more sparkling clean notes or funky rhythm chords to cut through. If you are using your amp at home or in recording situations we think you’ll be very happy with a stock DR, and maybe you even want your Deluxe Reverb to break up earlier sometimes. You will be able to shape your tone significantly with just the right speaker(s) and tubes.
You’ll need schematics to implement some of these mods. http://www.ampwares.com/fender.asp. We usually start with explaining a mod from a functional perspective where we relate to components in the logical schematics diagram. Finally we point out location of components in the physical layout diagram.
The Linda Ronstadt amp, a mini-Vibroverb.
Let us talk about one of our own gig amps; the “Linda Ronstadt amp”. It is a 71 silverface Deluxe Reverb that we bought from the Linda Ronstadt band. It came with a fantastic vintage flight case that had travelled around the world, 6L6 tubes, a GZ34 rectifier tube, a JBL d120f speaker and had been totally AB763-blackfaced with new wiring, a professional cap job and all. We were told it had been played by a lot of famous guitar players including the big texan Stevie himself.

The amp sounded big, hard and mean with tons of punch and sparkle, a mini-Vibroverb. Unfortunately it was too shrill and needed to be cranked really hard. Even then there was too much of the ice picky attack in the treble notes. We spent days playing it with different guitars and pedals, not able to decide whether we liked it or not. Maybe this was the reason the amp was sold? It sure sounded nice with a Tubescreamer which removes both the upper treble and lower bass, and this is also how Stevie achieved his tone. But we wanted more. We wanted to play this amp without a Tubescreamer and achieve a decent cranked tone. We finally decided to continue the path that team Linda Ronstadt had started, enhancing this amp to our needs. First we implemented the bright cap mod due to the bright speaker. This easily tamed the upper shrill notes allowing us to use the treble pot beyond 4 (all reissue amp owners with new Jensen C12n, read and learn).
 We also replaced the GZ34 rectifier tube with 5U4GB and re-adjusted the 6L6-bias to 33-35mA. The 5U4GB removes the instant attack that we struggled with and introduces more sag and compression. Then we pulled the V1 preamp tube and replaced the tremolo intensity pot with a new switchable one that can completly disconnect the tremolo circuit from the signal path when turned to zero (see tremolo disconnect mode below), both to thicken the tone by increasing the preamp gain in the amp. These mods took us 25 minutes including assembling the amp chassis and cabinet back together. The results amazed us once again. The shrill upper harmonic notes were tamed. The pick attack was now acceptable and the hard treble frequencies were compensated with punchy lower mids. It was now much easier to find a sweet spot and good EQ settings and we enjoyed a lot playing the amp with no boost pedals. Even the in-between pickup positions on strats came out quacky and cool without breaking our ears. The amp was now a true texas hot rod amp reaching an approx. 30 watt sweet spot around 3 on the volume knob. The tone reminded us very much of the 64′ Vibroverb diaz mod from Fender custom shop, just a little sweeter with earlier breakup. This amp is now definitly a keeper. A few years later we have several spakers in this amp next to the JBLd120f. The Eminence Maverick with an inbuilt 9dB attenuator can turn down the volume to a Rrinceton Reverb still achieving full tube break up. We are also very happy with a EVM12L speaker in this amp.
What does the Deluxe Reverb sound like?
It sounds like most blackface/silverface amps, full American tone with sparkle and punch. Clean tones are great as on all these Fenders. It has 22w clean headroom and breaks up at around 4 on the volume knob with a single coil guitar. The 1×12″ speaker gives a decent spread on stage with rich lower mids and the speaker can alter the tone very much on its own. Below is Lars Håvard Haugen, lead guitarist in the Norwegian country rock band Hellbillies, playing his 6L6 Deluxe Reverb with a JBL M1 speaker. This amp was set up for him in Feb 2013 by fenderguru.com.
Here is our own Linda Ronstadt amp loaded with an EVM12L speaker.
We’re also happy to share with you that we set up a similar amp to Amund Maarud, a real Norwegian blues guitar “hero”; a hot-rodded Fender Deluxe Reverb. This amp has diode rectifier, TAD 6L6, Eminence Swamp Thang and Pull V1 mod. A fantastic tone. Listen for yourself.
The Norwegian rock guitar hero Knut Schreiner, aka Euroboy, lead guitarist in bands such as Turbonegro and Kåre and the Cavemen, pairs his new Fender gig amp with a VOX AC15:
Five fundamental tricks to create the holy grail of Fender tone
Here is a video demonstrating the effects of some of the mods and tricks described here. To see embedded text comments, go to video on Youtube.
Speakers
The easiest and most effective mod of them all. The speaker is the most important component in your amp which physically produces the air waves that your ears detect as a tone. If you have an original Oxford speaker you’ll experience a significant change (to the better, in many’s opinion) by swapping to almost any other speaker. By most guitarists the Oxfords are considered weak and they fart out in the lows when being pushed hard. Because of the low efficiency you’ll have to turn up the amp and push the tubes harder to get any volume. The Oxfords have gotten a bad rumor, not rightfully deserved in our opinion. Players who play clean will experience a well balanced and “vintage fender correct” clean tone. They’re not too loud and nor do they bother you with a shrill brightness. They do have some vintage vibes and a nice musical voice. Inefficient speakers can be useful in multiple speaker applications 2-4 x 10″ where the total areal of speakers will provide enough volume for you anyway. Let’s see it from another perspective. You’re will not experience any vintage vibe with a brand new Reissue Deluxe Reverb with new tubes and a super efficient Jensen C12n or C12k rated at 50 or 100W; Everything is too efficient with loads of glassy sparkle and attack, some call it harsh and icy. The Oxfords can actually offer the vintage vibe, like it or not.
An interesting fact is that the silverface Deluxe Reverbs had better speakers than the blackface amp. The blackface had Oxford while the silverface could have either Oxford, CTS or Utah. Having experienced all these speakers in several Fender amps, we consider the CTS and Utahs to be superior to Oxford, particularly in single 1×12″ application requiring high performing speakers that can deliver both punch and sparkle. The good news is that you may get reconed Oxford speakers that sound awesome. There is your ultimate player’s and collector’s amp.
See page How to select speakers for speaker recommendations.
Baffle and 2×10″ speaker configuration
By replacing the original 1×12″ baffle with a 2×10″ baffle you’ll get a bigger sound and more flexible amp. A 12″ speaker is slightly harder to drive than a 10″ and if you’re really into soft touches and finger tips you’ll probably appreciate the dynamics of 2×10″ more than with a 12″. An interesting effect with 12″ speakers is the wide “3D” spread. While 10″ speakers are front directional a 12″ have noticeably more spread. It contributes to a better sound spread on stage and your band mates will hear the amp better. A nice trick with multiple speaker configuration is to disable speakers in case you need less volume. The output trafo in DR is designed for an 8 ohm load, yet it can be used for 4ohm without any risk for damage. A practical tule of thumb is that all Fender OTs will handle a 100% mismatch in speaker impedance. Example: An amp with a 4ohm OT (Twin, Pro Reverb, Vibrolux) will handle both 2ohm and 8ohm speaker loads, even though it’s optimal performance is at 4ohm in terms of amp headroom, trafo distortion/sag and power tube wear. A mismatch in impedance to a higher impedance will make the power tubes distort more. Tubes are also pushed harder and will be weared out slightly faster.
For 10″ recommendations, see the Princeton Reverb, Vibrolux Super Reverb pages. Perhaps you want to mix speakers, having Alnico + Ceramic or dark + bright speaker. Be careful not to pair two very different speakers since the result will be unbalanced, directional and you’ll get confused when you’re micing th amp. The efficiency should be more or less equal so that both speakers are coming through. If you have one super bright speaker (Jensen alnico) and one very dark sounding, you won’t be able to utilize the dark one since you’ll be setting the treble to match the bright speaker.
12AY7 or 12AT7 as preamp tube – Less preamp gain.
If you want a cleaner and spankier tone you can replace the V1/V2 12AX7 preamp tube with 12AT7 or 12AY7. These tubes have lower voltage gain and different frequency responses, particularly when distorting. 12AX7 tube has a voltage gain factor = 100, while 12AT7 = 60 and 12AY7 = 45. One could describe these tubes to have less harsh and buzzy distortion. This mod does not alter the tone significantly when amp is played clean’ish. You’ll have to increase the volume setting to achieve a similar volume as before. If you hit sweet spot at volume=4 with 12AX7 you may go as high as 6-7 before reaching it with 12AT7 or 12AY7.
Pull out the V1 normal channel preamp tube for more preamp gain in vibrato channel
We’ll start with saying that this is a mod we personally do to all dual channel blackface, silverface and reissue amps. It is so easy to enable and disable that it can hardly be called a mod. If you are like most players and only use the Vibrato channel (reverb, tremolo, the bright cap and the extra gain stage), you should pull out the V1 tube. This is the preamp tube for the normal channel which you are not using when playing the Vibrato channel. Vice versa; If you’re using the Normal channel, you can pull out the V2 tube. All AB763-similar circuits (Deluxe Reverb, Super Reverb, Pro Reverb, Twin Reverb, Vibroverb, Vibrolux) are designed so that they share the cathode cap and resistor (25 uF/1500 ohm) and pulling one of the tubes will changes the effective value of the resistor they both share. If you pull one tube the other channel’s tube will be hotter biased and offers more gain. The amp will play louder than before given the same volume knob setting. The stronger signal will push the second gain stage (V4 tube) harder and give you increased sustain, compression and harmonics. This mod does not change the amp’s clean headroom but increases the preamp gain and preamp distortion.
This mod is one of Cesar Diaz’ tricks in the Fender Custom Shop Vibroverb 64 which he always did to Stevie’s amps. This mod is safe. It has stood the test of time and been been done by players in 50 years in blackface Fender amps.
Replace the 12AT7 PI tube with a 12AX7 or 12AU7 – Less clean headroom.
Very practical mod at practice and low volume environments. This mod reduces the amp’s clean headroom and you’ll achieve sweet spot at a lower volume. You’ll notice that the amp gets looser and with less attack. Tips: If you pulled the V1 12AX7 tube you may use it as V6 phase inverter.
12AX7 as phase inverter tube will give the most effect out of this mod. 12AU7 will be in between 12AT7 and 12AU7.
Replace the 12AT7 reverb driver with 12AU7 – Better reverb control.
Reverb is an important character with vintage amps, yet so individual and mysterious. We all know that speakers change their tonal character during age. So does the reverb. The reverb function sounds and behaves differently between “identical” vintage amps. Some amps have long, lush and soft reverb while others are mushy and overwhelming. We often find the reverb sweet spot around 2.5 on the reverb pot, varying from 2 to 4. Some amps are sensitive and difficult to control the reverb on. The whole dynamic area can be within a narrow interval, i.e. 2 and 2.5. These amps require a careful touch when dialling in the reverb, which irritates us.
The reverb circuitry consists of two tube sections (reverb driver V3 and reverb recovery V4) and the physical reverb tank. All these components will drift during age and minor differences in component values are noticeable to man’s ear.
If you replace the V3 12AT7 reverb driver with a 12AU7, you will reduce the effect of the reverb and it will be much easier to control with the reverb knob. So simple as that.
Use normal channel for reverb control – Adjust EQ and depth of reverb.
This mod is relevant only for two-channel amps with normal and vibrato channel. This trick is great for the reverb enthusiasts among us, and who is not? Plug your guitar into the vibrato channel, then unplug the reverb return cable on the back of the amp (the one that comes from the reverb tank output) and plug it into the normal channel input. You will need a converter to go from male phono/RCA jack to a 1/4″ male jack. You may now use the normal channel as a reverb control where you can adjust the depth and tone using the volume, bright switch, treble and bass knobs (and mid if you have a Twin Reverb). The reverb knob on the vibrato channel will have no effect any longer.
This mod is not applicable together with the Pull V1 mod, as you need the normal channel preamp tube.
Diode rectifier – More clean headroom.
This mod is for those who wants more power, clean headroom and attack. It is very practical to bring with you those small Sovtek plastic adapters that easily can replace the rectifier tube. You’ll increase the power of the amp with a few watts. The diode rectifier will feed your amp’s filter caps with a higher and “faster” DC voltage compared to a tube rectifier. The fact that it delivers a slightly higher DC voltage to your power tubes (via the filter caps) means an increase of the tube voltage gain factor. When you hit a hard chord the preamp and power tubes will require energy and current is flowing from the DC filter caps which are charged up by the rectifier. If the rectifier can deliver more energy more quickly, you’ll have more power and attack.
Please be aware of that using gz34 or diode rectifier will wear you 6v6 power tubes faster than with a 5u4gb due to the higher plate voltage. Some 6V6 tubes are better than others in handling higher voltages. The TAD and JJs are rough and can take a lot of beating.
Check also out Ted Weber’s “Copper Cap Rectifiers” that emulates the sag of a tube rectifier.
6L6 power tubes – More power and clean headroom.
If you want more power you can easily replace the 6V6’s with 6L6GC. You need to rebias the amp to prevent wearing out the tubes and/or to get a cold and harsh tone. We prefer bias at 32-35mA, perhaps hotter if you like more gain. The power circuitry (power trafo, filter caps, voltage divider caps) in Deluxe Reverb are capable of handling the extra current that 6L6 tubes will pull from it. Ths Deluxe AB763 has a plate voltage of 410V and if you insert 6L6GC you still won’t be so loud as Vibrolux or Super Reverb with 440V and 460V plate voltage. A Deluxe Reverb with a 6L6GC is very smooth and forgiving with lots of sag in transformers, filter caps and rectifier.
This mod will raise the effect in the power amp section. Hence, the clean headroom is significantly increased and you’ll also have the distortion characteristics of 6L6 instead of 6V6. Please be careful that your speaker can handle the extra watts. Be careful with vintage speakers that easily blow when taking 35-40 watts in stead of 20. An original Oxford 12″ will most likely blow if you, inspired by you-know-who-from-Texas, pluck the low E string hard at the end of songs.
Ideally you should halfen the speaker impedance when going from 6V6 to 6L6, but as mentioned elsewhere it is safe on these amps to vary the speaker load from -50% to + 100%.
This 6L6 mod is very effective together with a 2×10″ speaker baffle with 8 ohm speakers, which makes the Deluxe Reverb more or less a Vibrolux Reverb. You will then have a better impedance match and more effect utilized from the 6L6s. For low wattage gigs you can use only one of the 10″ @ 8 ohm speakers. For gigs that require a big clean sound you simply engage both speakers. You now have a 30-35W amp.
Tremolo disconnect mod – More preamp gain in vibrato channel
The effect of this mod is similar to pulling the V1 normal channel preamp tube when playing the vibrato channel. This is also a very popular mod in AB763-similar circuits (Super, Twin, Vibroverb, Pro Reverb, Deluxe, Vibrolux).
By original design the tremolo circuit will absorb current/signal even when one turns the tremolo off with the footswitch. This mod suggests to entirely disconnect the tremolo circuit from the signal path by replacing the tremolo intensity pot with a switchable pot (spst). One side effect with this mod is a noticeable click and a volume difference between tremolo on and off using the new spst pot. If one uses the tremolo regularly one should still use the tremolo pedal to enable/disable the tremolo and leave the intensity spst pot at your desired level. The spst pot is not good for enabling and disabling the tremolo very often (because of the click and the volume difference) but is a nice when you play without tremolo. A good thing with this mod is that you have both the tremolo pedal and spst pot to use.
With a new switchable/spst pot set at intensity=0 the mod will kick in and raise the signal level in the preamp section, right before the phase inverter. Once you’re turning up the tremolo the circuit is connected again and the tone will remain original. This mod does not increase the amp’s clean headroom. We would describe the effect as making the tone richer, fuller and more powerful with stronger mids that pushes the power amp section harder (phase inverter + power tubes). We like this mod a lot for stratocasters wi the Fender AB763-similar circuits since they boost a relatively scooped and thin sounding guitar and amp. In addition to pulling the V1 tube, this mod is one of those must have mods which we never undo once having implemented it.
This mod is one of Cesar Diaz’ tricks in the Fender Custom Shop Vibroverb 64 which he always did to Stevie’s amps. This mod can be implemented in two ways, either by unsoldering the tremolo circuit or replacing the tremolo intensity pot with a switchable pot, so-called SPST pot. The switch is enabled when you turn down intensity to zero. There are also switchable push/pull pots where you pull the knob to enable the switch.
- Order a 50k SPST from one of our recommended amp part dealers.
- Remove the original 50k trem intensity potmeter by unsoldering the wires to the potmeter lugs and unmount the pot from the chassis. The black plastic wheel is to be used for the new pot.
- Install the new 50k SPST pot to the chassis. This is a switchable pot offering a mid positioned switch in addition to the variable resistance 0-50 KOhm between the lugs. At level=0 you’ll completely disconnect the tremolo circuit.
- See the wiring diagram below.
- You’ll have to solder the yellow wire to one side of the mid positioned switch instead of to the right pot lug as before.
- Then solder a new (red) wire between the other side of switch to the right lug.
If you’re permanently disconnecting the tremolo circuit you can just clip of the brown and yellow wires and insulate the ends with tape. Note that the figure below shows the Super Reverb. The Deluxe Reverb would be the same.
(One may also use the tremolo pedal, instead of the spst switch/pot, to entirely disconnect the tremolo. You will not need to replace the intensity pot with a spst, but let the yellow wire to the tremolo pot go through the tremolo pedal. In our opinion this is not a good idea since one loses the possibility to use both the spst switch and tremolo pedal. Using the pedal will now involve a significant click sound and volume increase.)

Bright cap
Unlike it’s bigger brothers, the Deluxe Reverb came with no bright switch. Instead there is a hard wired bright cap 47pF in the Vibrato channel enhancing the upper treble notes. The Normal channel did not get this bright cap. You may choose to clip one of the legs on this 47pF cap to turn the bright switch off, or you may want to install a identical bright cap to the normal channel. See red circles in figures below for this cap. The cap is installed directly between the volume pot lugs.
Schematics

Layout

Click images for large versions.
Blackfacing
If you are like us and can’t sleep without knowing you have the blackface specs you should read this chapter. It takes little effort to blackface the silverface DR models without the push-pull volume boost. The questions is which blackface circuit do you target for? We recommend the AB763 due to its robustness. If you have a blackface DR you should inspect both the circuit and tube chart to verify which model you have, either AA763, AB763 or AB868. Some amps have a different circuit than what the tube chart indicates.
The differences between AA763 and AB763 are listed below and marked with red colored circles in the figure. They do not affect the tone very much and we doubt anyone can tell the difference in an A/B test with a 30 minute soldering job in between. The first mid tone cap is perhaps something you want to investigate further.
AB763 vs AA763
- Mid cap in EQ circuit for both normal and vibrato channel was changed from 0.033?F to 0.047?F in AB763. This means less mids in the AB763 since more of the mid frequency signal leaks to ground through the 6,8 KOhm resistor. There is no mid pot in DR and if you want to a scooped tone, go with the higher cap value to minimize the mids. This cap is marked with a red circle at the left most side in the figure below.
- Just where the dry signal is mixed with the reverb signal (in vibrato channel) the 4,7 KOhm resistor was changed to 3,3K Ohm in AB763. This means that the mixed signal contains less reverb in AB763 since more current is passing through the dry path.
- The tremolo tube circuit had changes in capacitor wiring and one of the cathode resistor (from 56 to 100 kOhm). We haven’t experienced any significant tone differences between the two. Tone is not affected.
- The phase inverter circuit had two resistors changed. One of the 100 KOhm plate resistors was reduced to 82 KOhm. The 2,7 KOhm resistor was reduced to 22 KOhm. None will make an impact in tone.
- The 6V6 power tubes had 1.5KOhm grid resistors installed for safety reasons in AB763.
Logical schematics:

Layout:

Click images for full size versions.
AB868 got just a few changes (one important though) compared to AB763.
AB868 vs AB763
- The GZ34 rectifier tube was replaced with 5U4GB meaning more sag and less attack. You can select which one that matches your tone and style.
- Bias electrolytic cap was changed from 25?F/50V to 50?F/70V in AB868. Tone not affected.
- 1200pF caps on the 6V6 grids to filter out ultra high frequencies making the power amp section cleaner. These caps are mounted between ground and pin 5.
Logical schematics:

Layout:

Click images for full size versions.
The A1172 was based on AB868 but was changed further changes, some relevant to tone. An original A1172 will sound cleaner and thinner than AB763. Since we want to the DR to break up nicely and sometimes scream, we recommend modifying back to AB763.
A1172/A1270 vs AB763
According to schematics A1172 and A1270 are identical circuits.
- The GZ34 rectifier tube was replaced with 5U4GB meaning more sag and less attack. You can select which one that matches your tone and style.
- Bias electrolytic cap was changed from 25 µF/50V to 50 µF/70V in AB868. Tone not affected.
- 2.2 Kohm voltage divider resistor instead of 10 Kohm. Leads to a higher plate voltage on phase inverter 12AT7 tube. Increases the headroom in that tube. Layout diagram does not show this resistor. It is located in the filter caps “box”.
- 330 Kohm PI grid resistors instead of 1 MOhm. Also a 0.00 µF coupling cap to the PI instead of 0.01 µF.
- The reverb recovery circuit had a high-pass cap 2000 pF installed in parallel with the 220 Kohm resistor. It will remove the upper high frequencies in reverb signal. Not a significant change, but easy to roll back to AB763 specs by just removing it.
Schematics

Layout

Click images for larger versions.
Negative feedback loop
The negative feedback loop can easily be tweaked to alter the treble cut and distortion in your amp. The purpose of the NBF loop is to clean up the tone and cancel out the mid/higher frequencies and upper harmonics (distortion) at the entry point of the phase inverter which is placed in front of the power tubes. The NBF theory is that you take the signal from the speaker output, let it go through a resistor and mix it in at the entry point of the phase inverter. The speaker signal is out of phase (180 degrees) with the signal at the entry point of the phase inverter and will cancel out equal frequencies. If you disconnect the NBF loop you’ll notice that the volume increases and tone gets much more aggressive. More white noise too. unfortunately, which is why there is a NFB loop. You will fin the amp’s sweet spot at a lower volume knob setting without the NFB loop. Not only is there a volume shift, the amp’s clean headroom is reduced slightly. Most importantly the tone gets rougher and rawer with more mids and higher frequencies, aka presence. If you think your tone is too bright or harsh or you’re seeking a mellow and nice clean tone, you probably want to keep the NBF loop. This mod is for those who want more bite and a tone that really cuts through in the mix.
You may choose to implement the mod in several ways and in various combinations with the ground switch or a foot pedal. A foot pedal works like a boost/FAT pedal. If yo’re struggling to find a transparent boost pedal that keeps the natural Fender tone you should try this out. You will still have that beautiful Fender tone, just more and wilder.
- No negative feedback at all. Simply disconnect the feedback loop (a wire) and tape insulate it. You get the most effect of this mod by disconnecting the NFB loop entirely. You may experience that the tone gets harsh, depending on guitar, speakers and EQ settings of course. If so, read more about the cap in the next bullet point.
- Keep the feedback loop and install a .01 µF in series with the NBF resistor. This cap will prevent the lower and mid frequencies to go through the NFB loop. Depending on the cap value treble frequencies will be fed back to the phase inverter which cancels out the treble in the main path. The tone gets less harsh and you still have a noticeable effect. You should experiment with different cap values. Start with 0.01µF.
- Increase the feedback loop resistance value. A good starting point is around 1.5 and 3 KOhm. This reduces the effect of the feedback loop, making the amp break up more when the NFB is engaged. If you make the NBF switchable there will be less volume difference if you use a high resistor value. (Using a .01 µF cap is also recommended to minimize the difference a little bit between NBF on and off).
- Use the ground switch or foot pedal to make the NBF switchable. If you remove the death cap and free up the ground switch by removing existing wires to it (if you’re wondering what the ground switch does, you don’t need it). Then wire the ground switch in series with the NBF resistor. If you’re using a cap in the NBF loop this goes across the switch allowing treble to bypass independent of the switch. When the ground switch has disconnected the NBF loop the higher frequencies are still fed back through the cap. In practice you solder each the two cap legs to at each side of the switch between speaker terminal and NFB resistor.
Where to install foot-pedal or switch? The ground switch is easy available if you disable the power supply wires and death cap. For amps with reverb you could use the reverb footswitch phono plug if you are not using it.
Logical schematics

Layout

Click images for full size versions.
Multiple and flexible speaker output impedances (built-in attenuator)
This mod requires the knowledge of how to replace a transformer in your amp. The mod will give you multiple and flexible speaker output impedances where the external speaker output jack serves as a secondary independently speaker output. This flexibility is desirable for both 1×12″ or 2×10″ speaker configurations together with extension cabinets.
The original OT in a DL is sized for 8 Ohm speaker impedance (1×12″ @ 8 ohm). It will make sure the power tubes “see” the correct impedance and can operate at optimal conditions in terms of clean headroom potential and frequency response. If you were to replace the original OT with a 2 ohm or 4 ohm OT, the tubes will be pushed harder since they see a bigger load than expected (the tubes see the speakers through the OT). Both the volume and clean headroom will be reduced, yet the tone stays fairly the same (some clarity may be lost). This effect is similar to an attenuator, which is very nice when you want to achieve the amp’s sweet spot at a lower volume.
- In a 2×10″ @ 8 ohm speaker configuration, we recommend 4 ohm + 2 ohm output impedances.
- In a 1×12″ 2 8 ohm speaker configuration, we recommend 8 ohm + 2 ohm output impedances.
- Go to Mercury Magnetics website. Order the Deluxe Reverb multi-tap OT with 2, 4 and 8 ohm taps.
- Remove the original OT carefully in your Deluxe Reverb and store it away. Install the Mercury Magnetics OT.
- Wire the OT’s primary circuit just as before. Clip the cables nicely and twist them as Leo Fender’s gently old ladies did. Insulate the unused ones with tape.
- The OT’s secondary circuit will be wired differently. Wire the 8 or 4 ohm tap to the main speaker jack. Then wire the 2 tap to the ext speaker jack. You must first remove all existing wiring on the external speaker jack so that it is totally separated from the main speaker jack.
- Now you have two speaker outputs; 8/4 ohm + 2 ohm. You may use them independently and the ext speaker jack does not require the main speaker jack to be plugged.
We like this mod a lot. Especially since we’re using the original jack outputs. Choosing the 2 ohm output with a 8 ohm speaker will attenuate the volume a lot at practise and gigs.
Middle pot
The Deluxe Reverb did unfortunately come without a mid pot. Many players are happy with the default 6.8K mid resistor in the EQ circuitry, but some want what the others have; a 10K potmeter mounted in series with the 6.8 Kohm resistor. When the potmeter is set at 0 you’ll have an original tone, and when turned up the mids increases and your amp growls with a British Vox’ish tone (especially together with a Celestion speaker). For a wider tone range you can replace the 6.8 KOhm resistor with a 4 KOhm, and use the 10 K pot to go beyond the original 6.8 KOhm and up to 14 KOhm. If you do not use the reverb or tremolo pedal it is very practical to install the middle pot here. It requires a simple solder and removal job to replace the phono plugs with a mid pot. Or you could install the mid pot at the left most side of back of the amp where the additional power supply is located.
Logical schematics

Layout


