
The guitar and amp affect the tone in different ways. We’ve said earlier that the amp and the speakers are the most important for what you hear, and we stick with this. Still, the amp can not produce a signal that was never there from the beginning (except harmonic frequencies due to clipping/distortion). It is therefore important to know how the guitar works and how to improve and shape its tone. The guitar must be considered together with the amp and pedals. Some things you can change, some things you can’t.
Tone factors
Let’s list a few components and parts in the Fender Stratocaster that affect tone:
- Neck and fingerboard. The stratocaster has had maple necks since the very beginning. In 1962 they also offered the option of having a rosewood fretboard on top of the maple neck, a so-called rosewood slab board. The advantages were less friction between fingers and wood and less wear with the more robust rosewood. It is a rule of thumb that rosewood necks are generally darker sounding than maple necks. This isn’t always true, though. There are many individual factors in each neck that can make both rosewood and maple necks bright and dark. Two necks coming from different maple trees can naturally have different density, stiffness, humidity and weight. Even two necks coming from the same tree can be different because of where and how the wooden plates are cut from the tree. The purpose of the neck is both to steal/absorb some frequencies and respond with other desired frequencies. The initial pick attack and string vibration will make the neck wood vibrate. Depending on which frequencies that resonates well in a particular neck the strings will eventually vibrate at other frequencies in addition to the initial note. The neck is acting like a frequency filter and working together with the strings to produce a complex blend of frequencies. A general observation from our side is that a neck with a medium fat profile (thicker than the USA standard strat) will more likely resonate well and give a nicely sustained tone than a thin neck. Also, the thinnest necks do not have enough back side support for the left hand. We’ve experienced that sustain and tone richness is improved with larger necks, also the spank and bass response is tightened up in big necks, mostly noticed in larger one-piece necks of maple, ebony or other hard wood. But one must be careful to suit the size of your hands and fingers. Remember that playability is more important than tone – great guitarists appear to sound great through most equipment. We must also add that the we personally find straight necks most comfortable, offering good sustain and a consistent low action across the whole neck length. We always ensure on a montyly basis that our guitars’ truss rods are adjusted correctly.
- Strings. Weight, tension, distance to pickups, fret action. Thicker strings are darker and fuller sounding and have more sustain. New strings sound superior to older strings that are lubricated with fat and finger dirt. Change strings often if you care about tone and always wash your hands before playing your guitars. The closer the string vibrates to the pickup pole, the louder and more trebly the tone will be. Being to close may cause the magnetic field to prevent the string vibration, hence reduce sustain. The pitch may also change and the intonation gets false. Keep the distance! A very low fret action may cause the strings to collide with the highest frets while playing. This is very undesirable since the string will not vibrate freely after the initial pick attack. In stead you will hear the strings slam into the frets producing a high frequent metallic “snap” in stead of having a original, strong attack on the strings. Many players are not aware of this effect, or doesn’t seem to notice, and the result is a weak and thin sounding plink-ploink guitar.
- Pickups. The physical pickup nature or magnetic power, coil resistance and inductance. Pickups are heavily discussed elsewhere, and we dare not start a discussion here. One must make sure that the pickups match the other guitar parts and components. A dark sounding neck should not be used with a dark body or pickups since you will get a muddy and lifeless tone. On the other hand, a bright and sparkling body might come through very harsh if the pickups are also bright. You need to maintain balance between these. Pickups are easy to swap and you should experiment with different brands and models and try to adjust pickup height. Remember that the pickup height alters the tone. The closer the more treble, attack and volume you get.
- Electrical circuitry and components – explained below.
- Tremolo bridge. Saddles, spring tension, fixed one-way vs floating bridge. A quality tremolo bridge is important for the sustain. We find the sustain to be improved when tremolo springs are tightened so the bridge leans hard against the body. This allows only for frequency drop with the tremolo, but it is worth it due to increased sustain. Which type of metal that is used in the bridge saddles plays an important role. Brass is more mellow than steel.
- Body. Wood, density, weight. The force of the string vibrations is connected to the body via the tremolo bridge. The body must be resonant and vibrate nicely not absorbing this energy. Compared to the neck we find the body to play a less important role.
- Lacquering and paint. The paint must not prevent the string vibrations from being propagated between neck, tremolo bridge and body. All these are physical, mechanic connections where the metal and wood is in motion. Thick layers of paint and lacquer may reduce the resonance, especially below the tremolo bridge. Watch out below the tremolo bridge and in the neck pocket.
In this section we’ll breefly explain how components inside the Stratocaster affects the tone. Below is the wiring diagram for the American standard stratocaster model. This is the most standard wiring – three single coil pickups, 5-way switch, 250k volume and tone pot, the lower tone pot coupled for both mid and bridge pickup and no treble bleed components/wiring. Search the Internet for more sources of in-depth information on how pickup works and the physical and magnetic interaction between strings and pickups.  The next figure whows the the equivalent electronic circuit schema. The schema is simplified here and does not show the internal pickup details – wiring dc-resistance, capcitance and, most important, the pickup inductance. The schema also shows the curcuit assuming the pickup switch is in position 1, 3 or 5, using only one pickup and one tone pot.
  Like water and other things in nature – current seeks to ground through the path of least “resistance”. A electric path that has little “resistance” will lead more current than a path with higher resistance. Audio potmeters in guitar and resistors in amps have the same electric resistance for both dc(constant voltage, like a 9v battery) and ac currents(time-alternating, like 110/230V net current or an audio/guitar signal). They are simple and easy in this way. Capacitors act different for signals of different frequencies. Cap’s are measured and specified by the term capacitance, with unit farad. The capacitance describes the cap’s ability to store electric potential – the bigger cap, the more electrical energy can be stored in it. Dc-current and low-frequency signals see a cap as a high electrical “resistance”. High-frequency signals see the same cap as a much smaller “resistance”. Caps are often used in circuits where it is desired to stop or pass the high- or low-frequency parts of the signal – often called high- and low-pass filters.
What happens when the strings vibrate?
- As a result of the guitar strings movement near the pickup’s magnetic field, a small amount of current is induced (created) in the pickup coil wire.
- The pickup current is divided in two paths – 1) through the tone pot R2 and tone cap C1 and 2) through the volume pot R1
- Tone-Pot: Set at max=10, fully clockwise seen from the guitarist, the resulting resistance R2 for the current is 250 K ohms. This is a high resistance where most of the current will continue to the volume pot rather than going towards ground. At fully counter-clockwise position, tone=0, the resistance R2 is 0 (zero) ohms allowing all the current to leak through here on its way to ground. Next in line is the capacitor C1 which will allow higher frequencies to pass through it, meaning that the treble-part of the signal will be grounded and is lost. The bass/lower frequencies however will see the capacitor as a much higher “resistance”. They will not pass through the tone cap but is forced to go to the volume potmeter towards the jack output. The result: the tone gets darker when the tone knob is turned from 10 and down. The treble is leaked to ground. The bigger the tone cap, the more treble is lost and darker the tone. To big cap will result in a muddy tone, like a carpet in front of your speaker. To small tone cap results in the tone knob not taking away the treble as much as you want – even at minimum tone you find the tone too bright.
- Volume-Pot: from the circuit you see how the output jack (hot tip) is wired into the circuit at the middle leg of the pot. Setting the volume at zero means zero resistance between ground and the output jack hot tip – the volume pot at minimum grounds the signal. Setting the volume at maximum results in 250kohm between ground and the ouput, meaning a higher voltage applied over this 250k resistance and a stronger signal going out.
What can we possibly draw from this? Which components affect the tone in what way?
- The volume pot, tone pot and tone cap will all affect the tone. They will determine how much of the original pickup signal is leaked either to ground inside the guitar or passed to the amp. In general:
- Higher volume pot resistance -> brighter tone. Single coil guitars often have 250K volume pots while humbuckers have 500K. Since the humbuckers produce a much hotter and darker signal it is desirable to use 500K pots rather than 250K to get clarity in your tone. A smaller volume pot will result in more treble loss in your guitar, and it is desirable to brighten the tone with humbuckers. Therefore higher volume pot resistance values with humbuckers.
- Higher tone pot value -> brighter tone. A higher resistance means less current to flow through the tone pot.
- Higher tone cap value -> darker tone. A higher cap value means more of the treble is lead to ground and lost in stead of being passed to the amp.
- A little current will always leak through the tone pot and cap even if the tone pot is set at 10 (max resistance) . This means the tone cap does affect the tone a little bit even when the tone knob is on 10. You can experiment with different tone cap values with loose cables hanging out from your pickguard and swap different caps while you play.
- If you need to tame the treble in a bright Tele or Strat, try to increase the tone cap value to i.e. 0.1 µF. A smaller value like 0.047µF will have more treble. The vintage 50’s strats had 0.1uF. Fender themselves changed this to 0.022uF later since many players thought the tone knob was too drastic in these strats.
- If you want more treble go for a lower tone cap value C1 (i.e. 0.01uF) and/or a bigger tone pot R2 (i.e. 500Kohm). This will also make the tone control “slower” and you have to turn it more to get an effect.
- The tone cap is shared between all pickups (in vintage wiring, the bridge is not wired to the tone pot). You may install a separate tone cap for the mid/bridge pickups allowing you to tune them individually.
- If you want a less or more sensitive volume knob, you may change this value. 250K and 500K are the most common values. The vintage 50’s strats had 500 K, while newer have 250 K.
At fenderguru.com we believe that 250k tone and volume pots is a good choice of clear fendery tone with just the right amount of sparkle and low-end. Also a 250K tone pot makes your guitar less sensitive to “bad” or long guitar cables with high capacitance that kill some treble and clarity. We also believe that 0,047uF is a good starting point for the tone cap in Stratocasters and Telecasters. For very bright guitars (either pickups, neck or body) we sometimes use a 0,1uF tone cap.
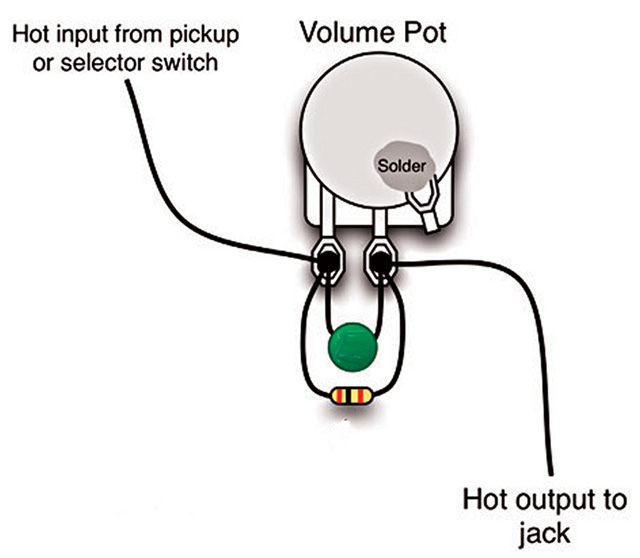
Treble bleeder kit
You may have noticed that the tone gets a little darker when you back down the volume on your guitar, especially for stratocasters and telecasters. This is an effect of the original circuitry from Leo Fender. Some like it, some don’t. Those who like it tend to appreciate a mellow rythm playing tone when backing down the volume. On the other hand, there are a few scenarios where you might enjoy having full treble at lower volumes:
– When you play solo and licks with reduced volume and want the same tone as on full volume setting.
– When you actively use your volume knob to go from cranked to clean sound (on a tube amp set in its sweet spot).
– When you play at reduced guitar volume with pedals, such as wah wah, fuzz, boost, overdrive/fuzz, and your pedals sound best with the same full and sparkling tone as on maximum volume.
If you recognize any of the scenarios above, you should consider the treble bleeder kit which allows the treble frequencies to bypass the volume pot and go directly to the amp. Please note that the effect of this mod is only present at reduced volume levels. At full volume there is no effect of the treble bleed cap + resistor (same with 50s wiring). The tone remains the same, as if it wasn’t there. A positive thing with the treble bleeder kit is that the behaviour of the volume knob is not changed very much. You will have the same approximate dynamic range.
The treble bleeder kit consists of a cap and resistor wired in parallel over the volume pot – from the top leg of the volume pot to the middle leg and hot tip output. Recommended component values from fenderguru.com are 680pF capacitor and a 220K ohm resistor.
This is the wiring diagram showing how you solder the cap+resistor on to the volume pot lugs.
50s wiring
The term “50’s wiring” is derived from early Les Paul guitars where the tone pot is wired differently from the standard Stratocaster circuit. The tone pot comes after the volume pot, between the volume pot and guitar output. An advantage with the 50’s wiring design is no treble loss when backing down the volume, which is the same objective as with the Treble bleeder kit. Lots of guitar players with strats, teles and other brands wire their guitars after the 50’s design because of a fuller tone with more treble when the volume is backed down.
We like this mod since one needs no extra components to re-wire a strat or tele circuitry into the 50’s wiring design. And it is very easy to implement and roll back, especially on the telecaster. But there is a side-effect with the 50’s wiring. The volume knob behaviour changes and gets more aggressive. The dynamic area is reduced and will lie between 6 and 10 on the volume knob (while the standard strat/tele wiring has a bigger range 1-10). The volume difference between 10 and 8 is significant with the 50’s wiring. We’ve had guitars with very smooth volume pots with little friction, and when we accidentally touched the volume knob with our right hand while playing, the guitar suddenly went silent because the volume knob was rolled down to 4-5. You may replace the 250K volume pot with one that has a wider taper area to avoid the sudden volume reduction.
Read more about the 50’s wiring on http://www.premierguitar.com/articles/3_Mods_for_3_Guitars.
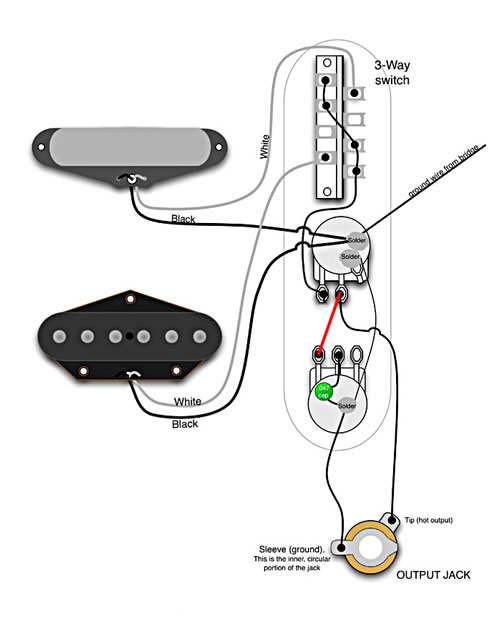
This is the wiring diagram for Telecaster, from premierguitar.com.
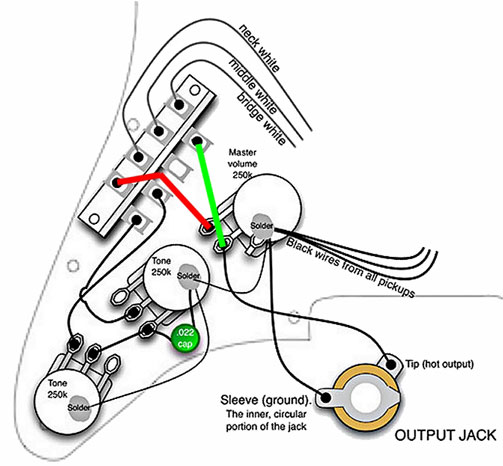
This is the wiring diagram for Stratocaster, from premierguitar.com.
Trele bleed or 50’s wiring?
So which is best, the Treble bleeder kit or the 50’s wiring? To our ears the tone is practically the same when you roll back the volume with these two approaches. We cannot hear any difference. And at full volume they behave identically by circuit design. We’d say the choice depends how you prefer the response and dynamic range of the volume knob. If you can live with the sudden reduction of volume with the 50’s wiring, you should try it out. If it gets too drastical, switch to the Treble bleed kit.
Stratocaster setup guide
Let it be said! A good instrument is key to good music and good tone. Good instruments can motivate us to play better and make us feel good and comfortable on stage, which is important for both professionals and hobby guitarists.
Going further, focusing on Stratocasters, a good guitar is initially given from the design and build of the guitar – wood materials, pickups & electronics, hardware, neck and fretboard. Good sounding guitars that are also easy to play can be hard to find among new guitars. Factory setup standards will vary, as will the setup from the people in the shops. You must ensure and learn yourself how to string and set up the guitar the way you like it, for your playing style and your tone preferences. Many times we find that used instruments are better to play than brand new ones, not necessarily because they are old and worn, but because they have had caring owners that have tweaked the details that make a difference.
A good setup will bring out the full potential in both cheap and expensive guitars. We are, sadly, not guaranteed a great tone from an expensive hand-made guitar. It has to be set up correctly and there is some amount of luck and randomness involved too, more often with cheaper gear than expensive gear. Some necks and bodies are just better than others, even if they’re cut out from the same tree and left the factory the same day with the same person making them. Good setup won’t compensate for that, but it will bring out the potential that each individual guitar has.
It requires experience, mileage and insight to understand how and why some strats are better than others. But first – what recognizes a good strat? Are there any objective and common standards that makes this discussion relevant between players with different musical tastes? Or is this all a matter of personal taste and preferences – just like music itself? We will try to address some of these questions in our setup guide. But first, let us try to define a little bit more what is considered a good guitar tone.
 For most players a good electrical guitar has a rich and sustaining tone on its one. But sustain is not all, we’re also looking for a resonance character where the neck and body responds with desirable frequencies based on the input frequencies from the vibrating strings. The guitar tone, aka frequencies and volume over time, is a result of how the wooden materials, hardware, pickups and the other electrical circuitry (volume pots, tone caps, etc.) work together in creating a mix of frequencies. To achieve a good tone all components must be balanced against each other, i.e. a bright neck should not be paired with bright pickups, at least the pickups should be lowered to tame the treble.
Who has not upgraded their guitar with expensive aftermarket parts in the search for a better tone? Good parts can help, but more important is the basic guitar setup. Or said in other words – you must ensure that your guitar is nicely set up before you start experimenting and altering its tone with mods and replacement parts. With a bad setup you will get a crap tone no matter how good parts you have. An example of that is too close pickups with a shrill and hard tone, bad intonation or worse, a loose truss rod and a neck curve that results in high action, several centimeters high. A good setup will ensure both tone and playability, allowing you to play fast and easy with superior tone.
From an engineering perspective, the Fender Stratocaster is a guitar of all dreams. It is both simple and robust. It offers several possibilities to easily tweak and adjust the behavior. Almost everything can be tuned and optimized to alter the tone and playability in several directions. If you master the art of setup of a Fender Stratocaster, you will get yourself one of the best instruments ever made on this planet.
We share with you fenderguru.com’s Fender Stratocaster setup guide.
String gauge
A very subjective area. Our personal recommendation for obtaining a rich and sustaining tone is to use as thick strings as possible, but not thicker than that. Not thicker than your fingers are able to control and handle, without getting tired and worn out. Your hands and fingers should not get tired after 15 minutes of playing a mix of chords and licks/solos. And not so thick that you loose the feel, power and ownership of your strings – practice, practice, practice. If the strings are too big you won’t have the necessary power, timing, control and ability to play fast, bend and apply vibrato. You will lose control with the risk of missing notes and playing out of tune or time. Therefore you must select a string gauge that matches the power in your hands and fingers. It’s okay to be inspired from someone else, but you should primarily trust your own mind and ears.
Let’s list a couple of advantages with thicker strings.
- Deeper and fatter tone and more sustain. Single coil strats have by design a relatively scooped tone compared to many other guitars, and we personally think thicker strings improves the tone and bring out more mids.
- Thicker strings have more tension and can therefore handle more beating and a harder pick attack before they are “over-hit”, resulting in either a too sharp note or the buzz and blizztering attack when they slam into the frets. All fret-buzz reduces sustain and volume. Thicker strings support a hard playing style better and you won’t lose pitch. The thinner strings you use, the softer you need to play to avoid that the strings are over-hit and out-of-pitch.
Tone fatness can partly be compensated for in pedals and amps – therefore you should use strings that suit your fingers with a correct relationship between finger strength and string gauge. Tuning down to Eb will allow you to use thicker strings and you will get a woodier and darker tone.
Our personal string gauge favorite is: 011, 014/015, 017/018, 024/026, 034/036 and 050/052 tuned down to Eb. This might be too thick for beginners, but after playing for some years this gauge allows you to bend and shake heavily. Our favorites are Pyramid round core nickel strings, but we are open to lots of different brands. It’s more important to have fresh strings and change them regularly.
Truss rod
We think that the truss rod mojo is really not complicated nor magical. Simply – as long as the truss rod is inside the ball park area, and not outside, all is well. The purpose of the truss rod inside the strat neck is to straighten the neck and prevent the string tension to bend it. We prefer a straight neck (straight as possible) to allow the lowest possible action along the whole neck length. Without having done any actual r&d on the topic ourself, or finding other facts or proof to support, we believe that the sustain is also better with a straight neck, which gives from the truss rod and the neck wood itself.
Adjusting the truss rod is an iterative process that can take days and weeks, depending on temperature and humidity and how much the guitar travels. The string gauge also plays an important role. Thicker strings will have a higher tension and bend the neck more. Hence, the truss rod must be tightened to straighten the neck. You should inspect the neck curve on a monthly basis and adjust the truss rod accordingly. You must allow the neck wood to stabilize and help it a little bit using your hands and carefully bend or stretch it out, depending on if you loosen or tighten the truss rod. A minor truss rod adjustment, i.e. turning the screw < 90 degrees, can take days before you see the neck stabilizes into its new curve. You should play the guitar as much as possible after adjusting truss rod to stimulate the neck curve change. When the temperature varies or if you change to a different string gauge, you might have to adjust the truss rod again.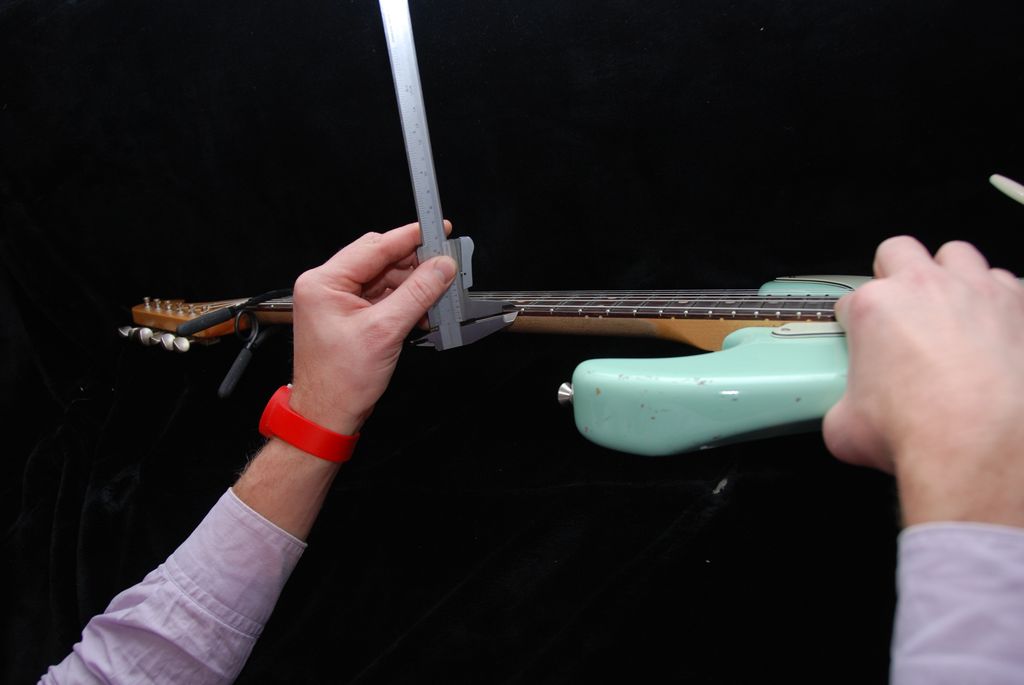
Adjusting the truss rod involves loosen the strings, tighten (or loosen) the truss rod, tune back the strings and measure the neck curve by looking upwards from the bridge. You can also press and hold down the high E string on the first and last fret to measure the distance between the string and the 8-12 fret. The string should be very close to the frets but it must not touch any of them. The string should vibrate freely when being plucked when you’re holding it down against the first and last fret. If you have old, worn and uneven frets you will have to adjust the action to suit the highest frets, those who are less worn. This means a higher action than necessaryon the neck areas where the frets are worn. These guitars will eventually need a fret job, meaning either re-fretting or leveling the frets.
String action
Also called string height, adjusted on the Strat bridge. This step requires you to have adjusted the truss rod first. Otherwise the action will be changed when you adjust the truss rod afterwards.
There is no correct answer in high vs. low action as it’s highly subjective. We’re sadly not sharing any millimeter measures, simply because we don’t know or measure the heights on our own guitars. We set the action by playing and tweaking by ear and feel. We will rather share a strategy and way of thinking for how to find your own preferences.
Selecting an optimal string action depends on your playing style, string gauge, hard vs. soft pick attack and if you optimize for chords or solos/licks. But most important is how much fret buzz can you live with. You need to check action regularly (bi-monthly) by ear together with inspecting the neck curve and adjusting truss rod.
If you play mostly rhythm and/or you play softly, you can have a low string action. You will benefit from a low action when playing chords since lower action requires less finger strength. If you intend to chop Stevie Vai solos with finger tapping and melodic scales in the speed of +25 notes pr. second, you should also aim for a low action and thinner strings. On the other hand, if your preferred style is Stevie Ray Vaughan’s Texas blues, thicker strings and higher action will allow for powerful bends and shakes with both sustain and volume intact – given you have the brute force and technique necessary.
You need sufficent string action to allow sustain, meaning the strings can vibrate freely without buzzing into the frets. The drawback with higher action is that you must apply more strength to press the strings down against the frets, and it gets harder to play fast. A set of 10-15 songs involving a lot of chords can wear you out totally if the action is too high or the strings are too thick/high tension.
The action is adjusted in several ways. Truss rod, nut adjustment (filing, sanding) and raising or lowering the bridge saddles. 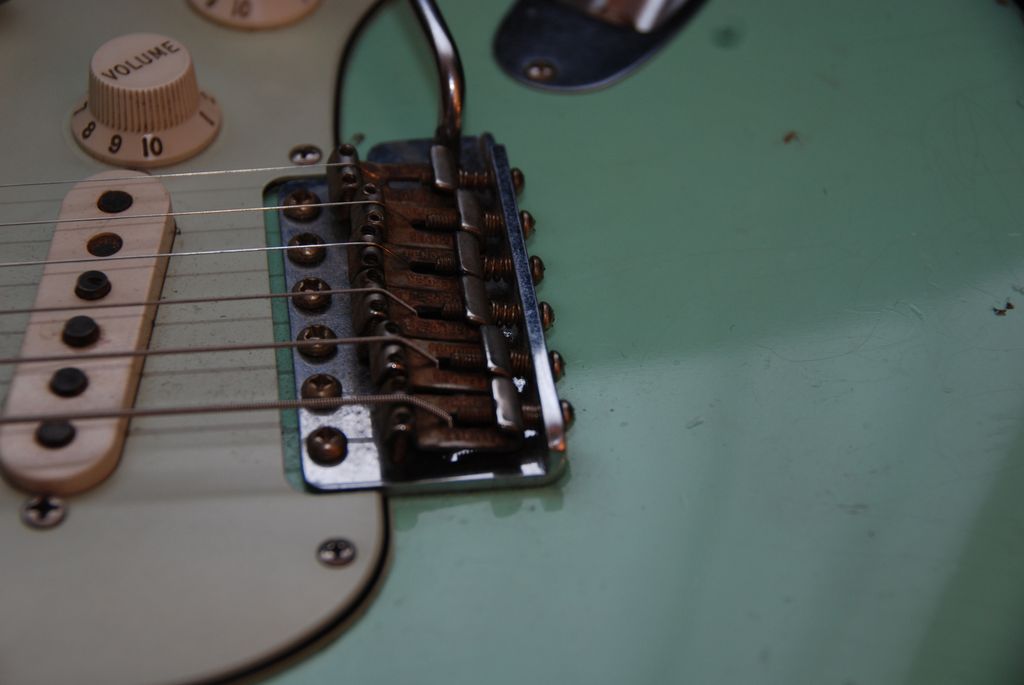
Start with the nut, and inspect the gap between the bottom side of the strings and the highest point of the first fret (open string of course ). The strategy is to aim for as little gap as possible without any fret buzz when you’re playing an open string with regular strength and pick attack. Use sand paper or sanding files and file the nut slots carefully so that the strings are lowered. If you sand too much and get fret buzz, the nut is spoiled. Either the nut has to be replaced or the whole nut must be raised by inserting a piece of paper or wood below the nut.
Raising or lowering the bridge saddles is much easier. The strategy is the same here, lower them much as possible without getting any fret buzz when you are playing licks high up on the neck and bending the strings a whole note. If you are never playing any notes above the i.e. 18 fret or not doing any bends and shakes, you can optimize the action from a lower position on the neck. Any potential fret buzz higher up will not be a problem for you.
After adjusting the action from a low and high neck position, you must verify the action and fret buzz halfway on the neck. Play some chords and licks on the 5’th and 8’th fret. Play with regular strength and pick attack. See if you must increase the bridge saddles or if you can possibly lower them.
Neck, fretboard and back side.
One of the advantages with vintage guitars is the worn neck wood. The worn wood and lacqer is smoother to play.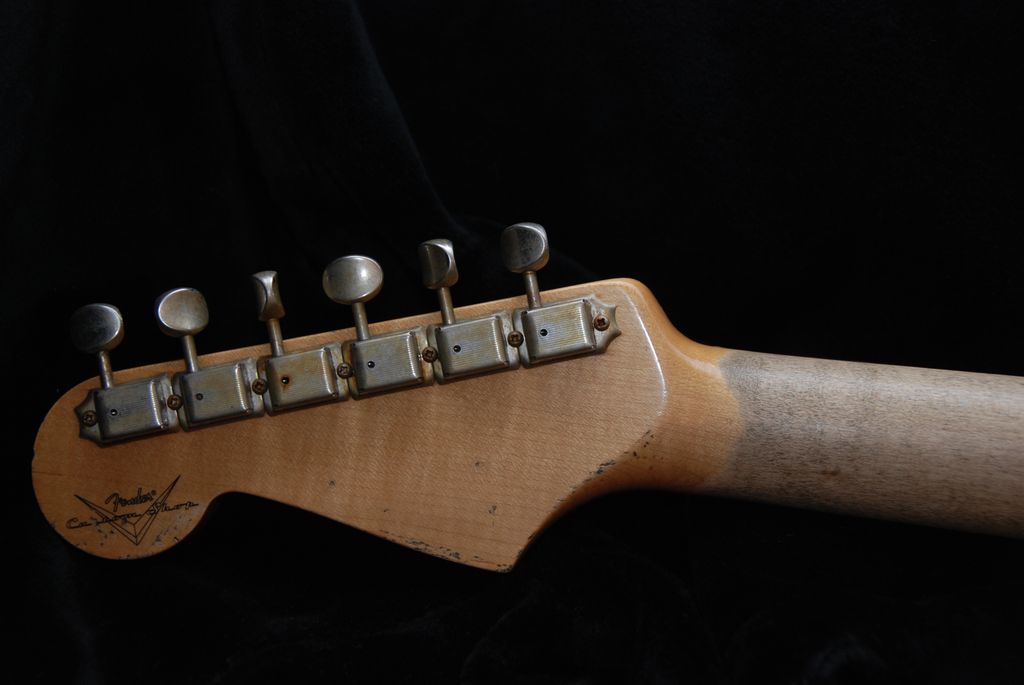
Newer necks and fretboards with glossy lacquer will create lots of friction, particularly when your hands are warm and sweaty. Lots of friction between fingers and fretboard will limit your playing a lot and makes it difficult to play aggressive solos with strings bends and shakes. It will feel like your strings are thicker and harder to bend. We recommend sanding one-piece maple necks with 600-sand paper to partly remove the glossy lacquer. We also recommend sanding the back side of the neck to allow smooth and friction-less change of grips. You can move up and down the neck fast and precisely. Use a fine grained sand paper.
Intonation
Needless to say. If you play chords and licks high up on the neck, you need to adjust the intonation or else the guitar will sound of tune. This should be done after raising/lowering the bridge saddles when adjusting the action.
Pickup height
An important step for tone. The closer the pickups are, the higher output and more treble you’ll get. If they are too close you’ll experience that the magnet field from the pickup interferes with the string vibration and kills the sustain. It is crucial that you inspect and adjust the pickup height after adjusting the truss rod and string action (nut and bridge saddles). Pickup height adjustment is an iterative process that can take weeks depending on neck tension and potential truss rod adjustment.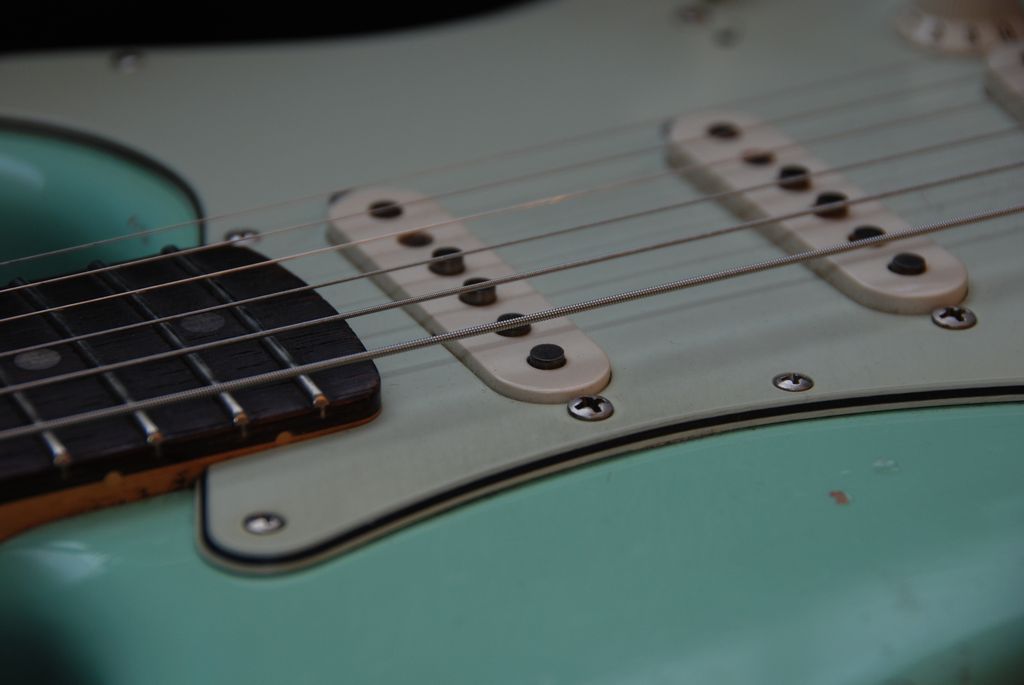
Depending on how hot the pickups are (magnet strength, number of windings) you need to adjust the distance accordingly. We recommend the following pickup height for hot pickups like Fender Texas Specials, Fender Fat 50’s, Lindy Fralin’s Vintage blues etc: Bass side: 3.3mm. Treble side: 2.6mm. For softer pickups like Fender Custom ’69, you can raise the pickups closer to the strings. Bass side: 2.6mm. Treble side: 2.2mm.
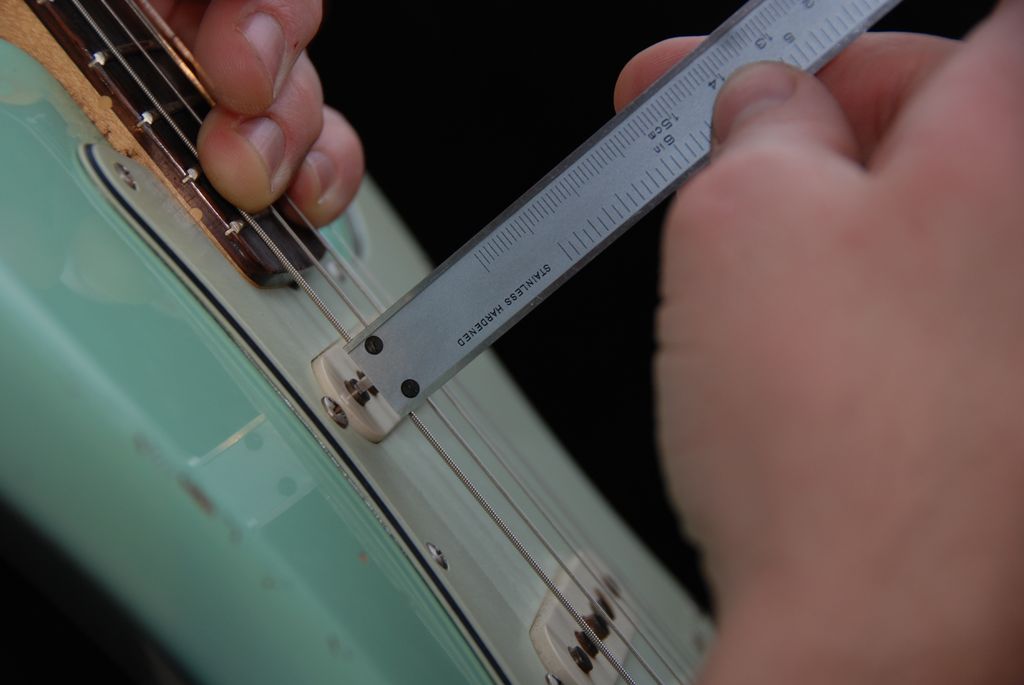 Start with the bass side. Press down the low E against the last fret and measure the gap between the pickup magnet pole and the bottom side of the string. This is the “bass distance” we’re referring to above. Repeat for treble side, the high E string. This is the starting point and from now you must adjust be ear. We feel it is better to have the pickups far away than close. When we adjust by ear we are playing chords and licks with the neck, mid and bridge pickup until the balance gets right. The three different pickup positions shall all sound equally loud in our opinion, but we know many who want to increase the volume on the bridge or neck pickup since they use these for solos.
Tremolo bridge
People prefer different setups for the vibrato (It is called vibrato and not tremolo, but everyone calls the strat bridge for a “tremolo bridge”. This is just as wrong as when we say a Fender amp’s “vibrato channel”. This is amp tremolo, by definition. Vibrato is an adjustment of frequency. Tremolo is volume).
Personally we adjust the tension of the five vibrato springs on the back side so that there is a little gap between the tremolo bridge and the guitar body. We like the vibrato to go both ways, mostly down but also a little up. We don’t like the tremolo bridge rest firmly down against the body. Some people claims that the sustain is improved this way, and we can agree to that to some extent, but we still prefer a vibrato movement in both directions. Good sustain must be ensured by having a quality bridge (Callaham, for example) and good body and neck wood. We also sand away the lacquer below the tremolo bridge where the screws enter the body, especially for Acryl based lacquer. We don’t want any lacquer to absorbe any energy between the bridge and wooden body.
Nut
A very important step. We’ve already discussed how you should sand the nut slots to optimize for a lowest possible open string action without any fret buzz. It is also important to keep the nut slot wide and smooth enough to prevent the strings to get stuck and locked. Use sand paper and verify that the strings are allowed to slide smoothly back and forth in the nut slot. You may even use wounded strings to file the nut with. Use a low E-string for the A nut slot, an A-string for the D nut slot and so on. If the nut slot is too tight and narrow, i.e. you are using thicker strings than the nut s used to, your guitar will get out of tune when you’re using the vibrato or when bending and shaking strings.
A tight and sticky nut is one of the things that really annoys us with new guitars. A worn and well played nut with correct string action is extremely valuable to us. We prefer a bone nut for both performance and the vintage correct looks, but we’ve also had graphite nuts that are smooth and well functioning.
In addition to sanding we lubricate the nut slots with Stewmac’s guitar grease whenever we change strings. This makes the strings slide smoothly and even allows us to do deep Hendrix dives without the guitar getting way out of tune. Of course the strings must be properly stretched and the tuners must work perfect for this to work.