Production years:
- 1964 -1967 blackface circuit AA964
- 1968 -1970 silverface circuit AA964
- 1971 -1978 silverface circuit AB1270
Tube layout
AA964 Tube layout (Seen from behind, V1 is to the right side)
- V1 12ax7 = Preamp tube
- V2 12ax7 = Vibrato / Phase inverter
- V3 6V6 = Power tube #1
- V4 6V6 = Power tube #2
- V5 GZ34 = Rectifier tube
Summary
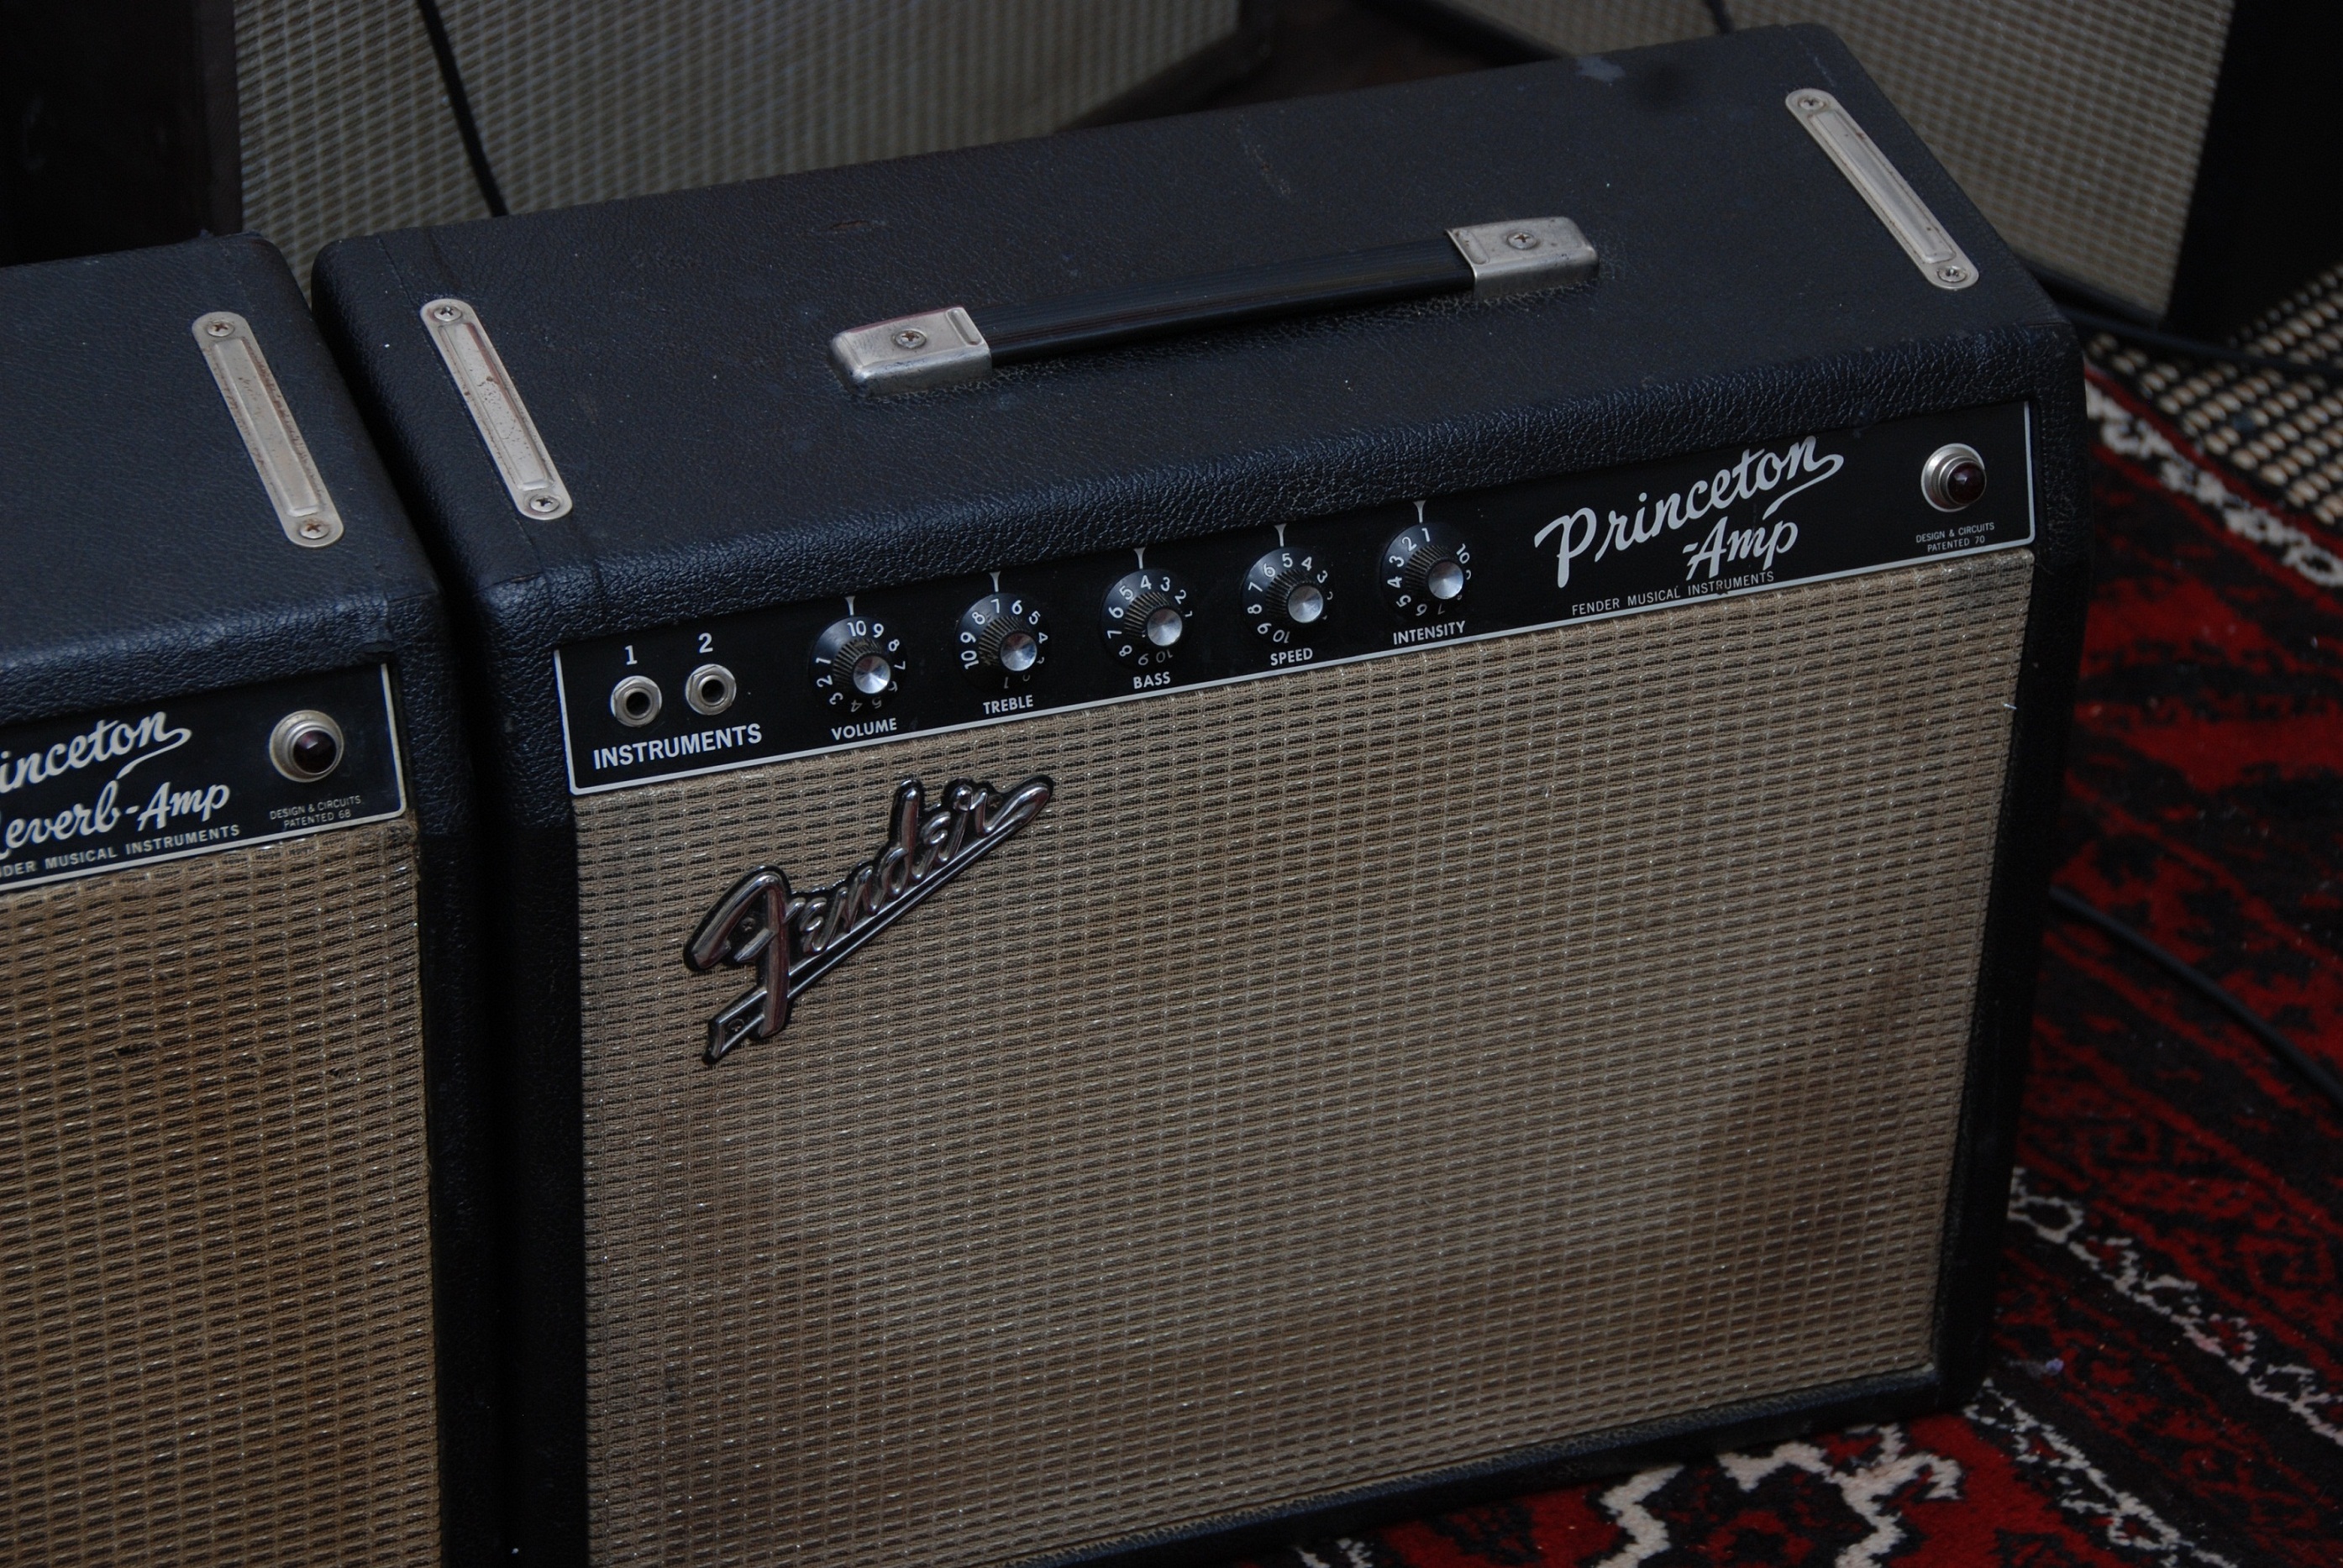
The Princeton Amp is often misinterpreted as a Princeton Reverb without reverb. Just by looking at the front panel and the knob functions it might seem so. A closer study of the circuit design will reveal that the Princeton Reverb has an extra gain stage (one half of the 12AX7 V3 tube) just after the dry and the wet reverb signals are mixed. This means that there is one extra tube stage that can cause preamp gain and contribute to the tone with sustaining harmonics, compression and sag. Hence, the Princeton-Amp is cleaner than the Princeton-Reverb when the volume is pushed beyond 3-4. The volume knob is less sensitive on the Princeton Amp, and you can play them on volume 7-8 still sounding clean.
So, why would you want to enhance or mod a Princeton? Due to its small size many players want to increase the power, volume and clean headroom. A few also wants to change the distortion characteristics. We’ve seen no other amp that has been analyzed so thoroughly in terms of mods and tricks to make it bigger. Does this mean you should implement the mods too? Not necessarily. Just because many people does so, it doesn’t mean it’s right for you.
In general we don’t recommend the mods that increase the power and clean headroom unless you are playing your Princeton at gigs on medium-large stages and you need the sparkling clean fender sound to cut through. If you’re micing the amp the audience should have no problem hearing a stock Princeton (we know: it’s really hard to trust the sound engineers). Your job is to make sure your band and yourself can hear the amp. If you are using your Princeton at home or in recording situations we think you’ll appreciate the early breakup of the original 6V6 power tube circuitry, the ineffective phase inverter, a smaller output transformer and a low-medium inefficient 10″ speaker. You are so luck to have a tube amp that you have to turn up where it breaks up nicely and shines trough. It’s what everybody really wants. So why increase the threshold of tube heaven?
You’ll need schematics to implement some of these mods. http://www.ampwares.com/fender.asp. We usually start with explaining a mod from a functional perspective where we relate to components in the logical schematics diagram. Finally we point out location of components in the physical layout diagram.
Speaker
See the Princeton Reverb page for an introduction to speakers with this amp. Also see page How to select speakers for general speaker recommendations. The picture below shows a 66 blackface Princeton-Amp with its Jensen C10ns speaker, a truly great American-voiced speaker and an important factor for the classic blackface Fender tone.

Baffle and 12″ speaker upgrade
By replacing the original 10″ baffle you can upgrade to a 12″ baffle and a 12″ speaker which pushes more air. It will give you a bigger sound with more low end and particularly more low mids. A 12″ can normally handle more power than a 10″ at both lower and higher frequencies. The 12″ speaker is slightly harder to drive and if you’re really into a soft touch and finger tips you’ll probably appreciate the dynamics of a 10″ more than with a 12″. An interesting effect with 12″ speakers is the “3D” sound effect. While 10″ speakers can be front directional (depending on cabinet also) there is a better spread with 12″ speakers which contributes to a better sound on stage. People will hear you better wherever they are positioned relatively to the amp. A 15″ speaker has even more spread and it will cut through skin and bone. We have never heard anyone who upgraded to a 12″ go back to 10″. Maybe that will tell you something. If you have a large speaker chassis be careful so that the speaker will fit under the output transformer. If you cut the baffle board your self out of a particle board plate (not difficult) you might want to align the speaker vertically low and slightly horizontally right (seen from the back). You could also move the OT if you are a capable tech which can drill and reorganize components in the amp chassis.
- Warehouse G12C. A full tone speaker with lots of touch sensitivity and slightly warmer than Jensen C12n.
- Jensen C12N. It is said: “If an alien came to earth and wanted to hear an American guitar sound, I’d play him my Twin with a set of Jensen C12N'”. This speaker is used in newer Deluxe Reverb reissues (the 100W model) and it has lots of punch and sparkling highs. Quite bright.
- Jensen P12Q. Beautiful Alnico compression. True vintage Fender sound.
- Weber Michigan 12″. Huge power.
- Weber California 12″. Huge power. Be careful that it will fit under your OT.
- Weber 12A125. Very much like Jensen P12Q, we like it even better.
- Weber 12A150. Darker than the 12A125. Lot’s of punch.
12AY7 or 12AT7 as preamp tube – Less preamp gain.
If you want a cleaner and spankier tone you can replace the V1/V2 12AX7 preamp tube with 12AT7 or 12AY7. These tubes have lower voltage gain and different frequency responses, particularly when distorting. 12AX7 tube has a voltage gain factor = 100, while 12AT7 = 60 and 12AY7 = 45. One could describe these tubes to have less harsh and buzzy distortion. This mod does not alter the tone significantly when amp is played clean’ish. You’ll have to increase the volume setting to achieve a similar volume as before. If you hit sweet spot at volume=4 with 12AX7 you may go as high as 6-7 before reaching it with 12AT7 or 12AY7.
Diode rectifier – More clean headroom.
This mod is for those who wants more power, clean headroom and attack. It is very practical to bring with you those small Sovtek plastic adapters that easily can replace the rectifier tube (either the 5U4 or GZ34). You’ll increase the power of the amp with a few watts. The diode rectifier will feed your amp’s filter caps with a higher and “faster” DC voltage compared to a tube rectifier. The fact that it delivers a slightly higher DC voltage to your power tubes (via the filter caps) means an increase of the tube voltage gain factor. When you hit a hard chord the preamp and power tubes will require energy and current is flowing from the DC filter caps which are charged up by the rectifier. If the rectifier can deliver more energy more quickly, you’ll have more power and attack.
Check also out Ted Weber’s “Copper Cap Rectifiers” that emulates the sag of a tube rectifier.
Negative feedback loop
The negative feedback loop can easily be tweaked to alter the treble cut and distortion in your amp. The purpose of the NBF loop is to clean up the tone and cancel out the mid/higher frequencies and upper harmonics (distortion) at the entry point of the phase inverter which is placed in front of the power tubes. The NBF theory is that you take the signal from the speaker output, let it go through a resistor and mix it in at the entry point of the phase inverter. The speaker signal is out of phase (180 degrees) with the signal at the entry point of the phase inverter and will cancel out equal frequencies. If you disconnect the NBF loop you’ll notice that the volume increases and tone gets much more aggressive. More white noise too. unfortunately, which is why there is a NFB loop. You will fin the amp’s sweet spot at a lower volume knob setting without the NFB loop. Not only is there a volume shift, the amp’s clean headroom is reduced slightly. Most importantly the tone gets rougher and rawer with more mids and higher frequencies, aka presence. If you think your tone is too bright or harsh or you’re seeking a mellow and nice clean tone, you probably want to keep the NBF loop. This mod is for those who want more bite and a tone that really cuts through in the mix.
You may choose to implement the mod in several ways and in various combinations with the ground switch or a foot pedal. A foot pedal works like a boost/FAT pedal. If yo’re struggling to find a transparent boost pedal that keeps the natural Fender tone you should try this out. You will still have that beautiful Fender tone, just more and wilder.
- No negative feedback at all. Simply disconnect the feedback loop (a wire) and tape insulate it. You get the most effect of this mod by disconnecting the NFB loop entirely. You may experience that the tone gets harsh, depending on guitar, speakers and EQ settings of course. If so, read more about the cap in the next bullet point.
- Keep the feedback loop and install a .01 µF in series with the NBF resistor. This cap will prevent the lower and mid frequencies to go through the NFB loop. Depending on the cap value treble frequencies will be fed back to the phase inverter which cancels out the treble in the main path. The tone gets less harsh and you still have a noticeable effect. You should experiment with different cap values. Start with 0.01 µF.
- Increase the feedback loop resistance value. A good starting point is twice the original resistor value. This reduces the effect of the feedback loop, making the amp break up more when the NFB is engaged. If you make the NBF switchable there will be less volume difference if you use a high resistor value. (Using a .01 µF cap is also recommended to minimize the difference a little bit between NBF on and off).
- Use the ground switch or foot pedal to make the NBF switchable. If you remove the death cap and free up the ground switch by removing existing wires to it (if you’re wondering what the ground switch does, you don’t need it). Then wire the ground switch in series with the NBF resistor. If you’re using a cap in the NBF loop this goes across the switch allowing treble to bypass independent of the switch. When the ground switch has disconnected the NBF loop the higher frequencies are still fed back through the cap. In practice you solder each the two cap legs to at each side of the switch between speaker terminal and NFB resistor.
Where to install foot-pedal or switch? The ground switch is easy available if you disable the power supply wires and death cap. For amps with reverb you could use the reverb footswitch phono plug if you are not using it.
Please note that the circuit below shows a Princeton-Reverb, but the change in a Princeton will be likewise.
Logical schematics 
Layout 
Bigger output transformer (Deluxe Reverb) – More power.
Simply replace the output transformer (OT) with a Deluxe Reverb OT. This reduces the output transformer sag and limitation that the Princeton is known for. With a bigger transformer you will experience more attack and a bigger sound due to more efficient power transformation from your tubes. You should consider this mod if you are increasing the headroom in your amp (Paul C mod, Stokes mod, Diode rectifier, etc ). In this case the original OT is not able to deliver this power to the speaker without absorbing some energy and introducing sag and too much compression.
Output transformer with multiple impedances (built-in attenuator)
This mod requires the knowledge of how to replace a transformer in your amp. This mod will give you different speaker outputs impedances converting the the external speaker jack to an independent output.
The original OT is sized for an 8 Ohm speaker impedance. It will make sure the power tubes “see” the correct impedance and can operate at optimal conditions in terms of clean headroom potential and frequency response. If you had an OT designed for a 2 ohm speaker load the tubes would operate at their best with a 2 ohm speaker load. If you use a 8 ohm speaker with a 2 ohm OT, the tubes are pushed harder since they see a bigger load than expected. Both volume and clean headroom is reduced significantly, and the tone is not significantly changed. This effect is similar to an attenuator, which is very nice when you want to achieve the amp’s sweet spot at lower volumes.
- Go to Mercury Magnetics website. Order the Deluxe Reverb multi-tap OT with 2, 4 and 8 ohm taps. Yes, we mean the Deluxe Reverb OT.
- Remove the original OT carefully in your Princeton and store it away. Install the Mercury Magnetics OT.
- Wire the OT’s primary circuit just as before. Clip the cables nicely and twist them as Leo Fender’s gently old ladies did.
- The OT’s secondary circuit will be wired differently. Wire the 8 ohm tap to the main speaker jack. Then wire the 2 (or 4 ohm) tap to the ext speaker jack. You must first remove all existing wires to the external speaker jack so that it is totally separated from the main speaker jack.
- Now you have two speaker outputs; 8 and 2 ohms (or 4 ohm). You may use them independently and the ext speaker jack does not require the main speaker jack plugged to work.
We like this mod a lot. Especially since we’re using the original jack outputs. Choosing the 2 ohm output with a 8 ohm speaker will attenuate the volume a lot. Having an amp with several different output impedances is practical for those who are using extension cabinets.
Middle pot
The Princeton did unfortunately come without a middle pot. Many players are happy with the default 6.8K mid resistor in the EQ circuitry, but some want what the bigger amps have; a potmeter mounted in series with the 6.8 Kohm resistor (or 4 KOhm for a even more scooped tone). In this way you can increase the mids to make your amp growl in a British Vox’ish tone (especially together with a Celestion speaker). We find it practically to install the middle pot at the back of the amp where the additional power supply is located. We never use this anyway. Please note that the circuit below shows a Princeton-Reverb, but the change in a Princeton will be likewise.
Logical schematics 
Layout 


The Stokes mod – increases voltage to the phase inverter
This mod is so thoroughly discussed elsewhere in different forums that we will only make a few comments on it. It will give your amp more headroom meaning you can play cleaner at a louder volume. Otherwise the tone of the amp stays much the same. You should also replace the output transformer with a larger one to cope. Here is one reference http://www.blueguitar.org/new/articles/blue_gtr/amps/john_paul_rick_PRmods.pdf.
The Paul C mod – convert PI to fixed bias
This mod will give you smoother distortion characteristics and a fuller sound. If you think your amp and speaker are sharp and edgy this mod could be worth a try. It will not increase the power and clean headroom. The mod requires some rewiring with a soldering iron and a new resistor. For description and schematics take a look here http://www.blueguitar.org/new/articles/blue_gtr/amps/john_paul_rick_PRmods.pdf.
Bass and tone characteristics.
The following mods are for those who want to change the tone in terms of more or less bass. To tighten up bass means removing the farty, low bass frequencies which are not handled well in a low power amp like the Princeton. These mods should be considered together with the particular speaker and effect pedals you are using to suit your music style. We do not say these mods should be implemented by everyone, we just inform you that there are techniques to shape your tone to suit your musical expression.
- Reduce input-stage cathode from 25 to 4.7 to “tighten up” bass.
- Increase 1st filter cap to 40uF (increase low end).
- Reduce coupling cap that feeds PI, also a means to “tighten up” the bass.