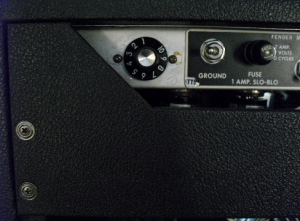
Production years
1963 -1966 blackface circuits AA763
Tube layout
AA763 Tube layout (Seen from behind, V1 is to the right side)
- V1 12ax7 = Preamp normal channel
- V2 12ax7 = Preamp vibrato channel
- V3 12ax7 = Vibrato tube
- V4 12at7 = Phase inverter
- V5 GZ34 = Rectifier tube
- V6 6L6 = Power tube #2
- V7 6L6 = Power tube #2
Summary
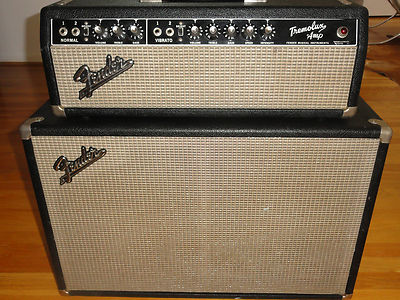
The blackface Fender Tremolux was produced just a few years between 1963 and 1966 and had one circuit model; the blackface Tremolux AA763. In terms of power and clean headroom it is the smallest of all the Fender piggyback amps. Its history is much less complex than the bigger Bassman and Bandmaster amps who experienced a rapid development in terms of different circuit models and tube configurations. The blackface Tremolux and Bandmaster (AB763) are almost identical amps, just that the Tremolux is sized for smaller events and gigs. The Tremolux had tube rectifier, while the blackface Bandmaster had diode. Both amps had tremolo but no reverb. The Tremolux speaker cabinet was 2×10″ and not 2×12″. The Tremolux had smaller transformers (power and output) than the Bassman and Bandmaster. All these things add up to an amp with less volume, less clean headroom and more sag/compression; a more forgiving tone.
What does the blackface Tremolux sound like? It feels very much like the blackface Bandmaster, the normal channel of the Vibrolux Reverb and Pro Reverb or the normal channel of the earliest blackface Bassman (AA864). The sound is nice and clean and the tone remains relatively clean when one turns the volume knob. One does not reach the sweet spot as early as with the Reverb-amps with an additional gain stage in the preamp section. The Tremolux uses only one 12ax7 tube in the preamp section in both channels before the signal enters the phase inverter.
The video clip demonstrates a blonde Tremolux, which is quite similar to the blackface.
The Tremolux is appreciated for its simple and basic circuit. A less complicated circuit means fewer things that can go wrong, less component drift issues, it’s easier to service and has less potential for noise problems. The Tremolux is rarer than the other blackface piggyback amps since it was produced over a shorter period of time. It was discontinued in 1966 and had no silverface models to follow. All the narrow-panel tweed, blonde and blackface Tremoluxes are very valuable today with a well-deserved collector status.
As for all amps you will be able to shape your tone significantly with selecting speakers and tubes. You’ll need schematics to implement some of these mods in this page. http://ampwares.com/brand/fender. We usually start with explaining a mod from a functional perspective where we relate to components in the logical schematics diagram. Finally we point out location of components in the physical layout diagram.
Speakers The 2×10″ closed cabinet that came with the Tremolux is practically sized and performs well on most stages. Oxfords or CTS speakers were delivered with these cabinets in the blackface years. A 2×10″ cabinet is easier to carry around than a 2×12″ cabinet, and with the right (wrong) speakers it can almost get as loud as the twelves just with less spread, lower bass and mids. You’ll find lots of modern, efficient 10″ speakers that can tolerate much more power than the Tremolux can deliver. Replacing speakers is the easiest and most effective mod of them all. The speaker is the most important component in your amp which physically produces the air waves that your ears detect as a tone. See page How to select speakers for speaker recommendations.
Jumping channels
Jumping channels means that one splits the guitar signal in to both channels. This can be done by using effect pedals or simply use a jack cable between one channel’s 2’nd input and the other channels first input. The two channels of the AA763 Tremolux channels are in phase and can be used together. 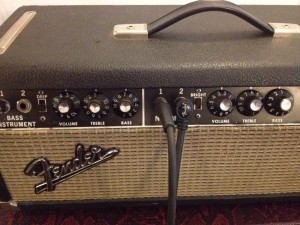 This is because they have the same number of preamp gain stages (each stage inverts the phase with 180 degrees). Jumping channels in the AA763 Tremolux can give you a wider spectrum of tones than by using just one channel. You may for example use the normal channel to deliver the bass tones and the vibrato channel for sparkling clean sound with bright switch on and zero bass. This will give you an full and meaty tone which you won’t get using just one channel. See picture below for example knob settings (using a Bassman). We recommend a closed or semi-closed speaker cabinet for this setting. You may increase volume further for cranking the amp harder. If you use Eb or open D tuning, your amp will growl like a bear.
5751, 12AY7 or 12AT7 as preamp tube – Less preamp gain.
If you want a cleaner and spankier tone you can replace the V1/V2 12AX7 preamp tube with 5751, 12AT7, or 12AY7. These tubes have lower voltage gain and different frequency responses, particularly when distorting. 12AX7 tube has a voltage gain factor = 100, while 5751 = 70, 12AT7 = 60 and 12AY7 = 45. One could describe these tubes to have less harsh and buzzy distortion. This mod does not alter the tone significantly when amp is played clean’ish. You’ll have to increase the volume setting to achieve a similar volume as before. If you hit sweet spot at volume=4 with 12AX7 you may go as high as 6-7 before reaching it with a 12AT7.
Pull out the V1 normal channel preamp tube for more preamp gain in vibrato channel
We’ll start with saying that this is a mod we personally do to all dual channel blackface, silverface and reissue amps. It is so easy to enable and disable that it can hardly be called a mod. If you are like most players and only use the Vibrato channel (reverb, tremolo, the bright cap and the extra gain stage), you should pull out the V1 tube. This is the preamp tube for the normal channel which you are not using when playing the Vibrato channel. Vice versa; If you’re using the Normal channel, you can pull out the V2 tube. All AB763-similar circuits (Deluxe Reverb, Super Reverb, Pro Reverb, Twin Reverb, Vibroverb, Vibrolux) are designed so that they share the cathode cap and resistor (25 uF/1500 ohm) and pulling one of the tubes will changes the effective value of the resistor they both share. If you pull one tube the other channel’s tube will be hotter biased and offers more gain. The amp will play louder than before given the same volume knob setting. The stronger signal will push the second gain stage (V4 tube) harder and give you increased sustain, compression and harmonics. This mod does not change the amp’s clean headroom but increases the preamp gain and preamp distortion.
This mod is one of Cesar Diaz’ tricks in the Fender Custom Shop Vibroverb 64 which he always did to Stevie’s amps. This mod is safe. It has stood the test of time and been been done by players in 50 years in blackface Fender amps.
Replace the 12AT7 PI tube with a 12AX7 or 12AU7 – Less clean headroom.
Very practical mod at practice and low volume environments. This mod reduces the amp’s clean headroom and you’ll achieve sweet spot at a lower volume. You’ll notice that the amp gets looser and with less attack. Tips: If you pulled the V1 12AX7 tube you may use it as the phase inverter tube. 12AX7 as phase inverter tube will give the most effect out of this mod. 12AU7 will be in between 12AT7 and 12AU7.
Diode or tube rectifier – More or less clean headroom.
Using a 5U4GB rectifier will slightly lower the power, clean headroom and attack with a few watts compared to the GZ34. You’ll get more sag and compression in the tone with a 5U4GB. If you have problems playing too loud with your Tremolux and you want a softer and sweeter tone, the 5U4GB will help you. Just opposite from the 5U4GB will a diode rectifier give you more power, clean headroom and attack. It’s very easy to bring with you those small Sovtek plastic adapters that easily can replace the rectifier tube. You’ll increase the power of the amp with a few watts. The diode rectifier will feed your amp’s filter caps with a higher and “faster” DC voltage compared to a tube rectifier. The fact that it delivers a slightly higher DC voltage to your power tubes (via the filter caps) means an increase of the tube voltage gain factor. When you hit a hard chord the preamp and power tubes will require energy and current is flowing from the DC filter caps which are charged up by the rectifier. If the rectifier can deliver more energy more quickly, you’ll have more power and attack. Check also out Ted Weber’s “Copper Cap Rectifiers” that emulates the sag of a tube rectifier.
Tremolo disconnect mod – More preamp gain in vibrato channel
The effect of this mod is similar to pulling the V1 normal channel preamp tube when playing the vibrato channel. This is also a very popular mod in the two-channel AB763-similar circuits (Super, Twin, Vibroverb, Pro Reverb, Deluxe, Vibrolux).
By original design the tremolo circuit will absorb current/signal even when one turns the tremolo off with the footswitch. This mod suggests to entirely disconnect the tremolo circuit from the signal path by replacing the tremolo intensity pot with a switchable pot (spst). One side effect with this mod is a noticeable click and a volume difference between tremolo on and off using the new spst pot. If one uses the tremolo regularly one should still use the tremolo pedal to enable/disable the tremolo and leave the intensity spst pot at your desired level. The spst pot is not good for enabling and disabling the tremolo very often (because of the click and the volume difference) but is a nice when you play without tremolo. A good thing with this mod is that you have both the tremolo pedal and spst pot to use.
With a new switchable/spst pot set at intensity=0 the mod will kick in and raise the signal level in the preamp section, right before the phase inverter. Once you’re turning up the tremolo the circuit is connected again and the tone will remain original. This mod does not increase the amp’s clean headroom. We would describe the effect as making the tone richer, fuller and more powerful with stronger mids that pushes the power amp section harder (phase inverter + power tubes). We like this mod a lot for stratocasters with the Fender AB763-similar circuits since they boost a relatively scooped and thin sounding guitar and amp. In addition to pulling the V1 tube, this mod is one of those must have mods which we never undo once having implemented it.
This mod is one of Cesar Diaz’ tricks in the Fender Custom Shop Vibroverb 64 which he always did to Stevie’s amps. This mod can be implemented in two ways, either by unsoldering the tremolo circuit or replacing the tremolo intensity pot with a switchable pot, so-called SPST pot. The switch is enabled when you turn down intensity to zero. There are also switchable push/pull pots where you pull the knob to enable the switch.
- Order a 50k SPST from one of our recommended amp part dealers.
- Remove the original 50k trem intensity potmeter by unsoldering the wires to the potmeter lugs and unmount the pot from the chassis. The black plastic wheel is to be used for the new pot.
- Install the new 50k SPST pot to the chassis. This is a switchable pot offering a mid positioned switch in addition to the variable resistance 0-50 KOhm between the lugs. At level=0 you’ll completely disconnect the tremolo circuit.
- See the wiring diagram below.
- You’ll have to solder the yellow wire to one side of the mid positioned switch instead of to the right pot lug as before.
- Then solder a new (red) wire between the other side of switch to the right lug.
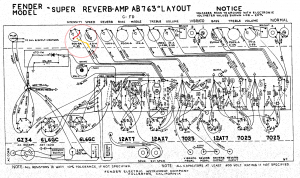
If you’re permanently disconnecting the tremolo circuit you can just clip of the brown and yellow wires and insulate the ends with tape. Note that the figure below shows the Super Reverb. The Tremolux would be the same.
(One may also use the tremolo pedal, instead of the spst switch/pot, to entirely disconnect the tremolo. You will not need to replace the intensity pot with a spst, but let the yellow wire to the tremolo pot go through the tremolo pedal. In our opinion this is not a good idea since one loses the possibility to use both the spst switch and tremolo pedal. Using the pedal will now involve a significant click sound and volume increase.)
Negative feedback loop
The negative feedback loop can easily be tweaked to alter the treble cut and distortion in your amp. The purpose of the NBF loop is to clean up the tone and cancel out the mid/higher frequencies and upper harmonics (distortion) at the entry point of the phase inverter which is placed in front of the power tubes. The NBF theory is that you take the signal from the speaker output, let it go through a resistor and mix it in at the entry point of the phase inverter. The speaker signal is out of phase (180 degrees) with the signal at the entry point of the phase inverter and will cancel out equal frequencies. If you disconnect the NBF loop you’ll notice that the volume increases and tone gets much more aggressive. More white noise too. unfortunately, which is why there is a NFB loop. You will fin the amp’s sweet spot at a lower volume knob setting without the NFB loop. Not only is there a volume shift, the amp’s clean headroom is reduced slightly. Most importantly the tone gets rougher and rawer with more mids and higher frequencies, aka presence. If you think your tone is too bright or harsh or you’re seeking a mellow and nice clean tone, you probably want to keep the NBF loop. This mod is for those who want more bite and a tone that really cuts through in the mix.
You may choose to implement the mod in several ways and in various combinations with the ground switch or a foot pedal. A foot pedal works like a boost/FAT pedal. If yo’re struggling to find a transparent boost pedal that keeps the natural Fender tone you should try this out. You will still have that beautiful Fender tone, just more and wilder.
- No negative feedback at all. Simply disconnect the feedback loop (a wire) and tape insulate it. You get the most effect of this mod by disconnecting the NFB loop entirely. You may experience that the tone gets harsh, depending on guitar, speakers and EQ settings of course. If so, read more about the cap in the next bullet point.
- Keep the feedback loop and install a .01 µF in series with the NBF resistor. This cap will prevent the lower and mid frequencies to go through the NFB loop. Depending on the cap value treble frequencies will be fed back to the phase inverter which cancels out the treble in the main path. The tone gets less harsh and you still have a noticeable effect. You should experiment with different cap values. Start with 0.01µF.
- Increase the feedback loop resistance value. A good starting point is twice the original resistor value. This reduces the effect of the feedback loop, making the amp break up more when the NFB is engaged. If you make the NBF switchable there will be less volume difference if you use a high resistor value. (Using a .01 µF cap is also recommended to minimize the difference a little bit between NBF on and off).
- Use the ground switch or foot pedal to make the NBF switchable. If you remove the death cap and free up the ground switch by removing existing wires to it (if you’re wondering what the ground switch does, you don’t need it). Then wire the ground switch in series with the NBF resistor. If you’re using a cap in the NBF loop this goes across the switch allowing treble to bypass independent of the switch. When the ground switch has disconnected the NBF loop the higher frequencies are still fed back through the cap. In practice you solder each the two cap legs to at each side of the switch between speaker terminal and NFB resistor.
Where to install foot-pedal or switch? The ground switch is easy available if you disable the power supply wires and death cap. For amps with reverb you could use the reverb footswitch phono plug if you are not using it.
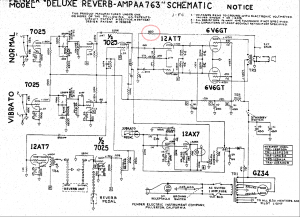
Logical schematics (shows the Deluxe Reverb)
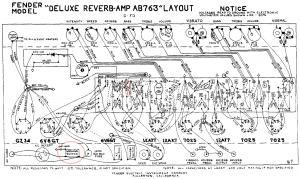
Layout (shows the Deluxe Reverb)
Click images for full size versions.
Middle pot
The Tremolux came without a mid pot. Many players are happy with the default 6.8K mid resistor in the EQ circuitry, but some want what the other amps have; a 10K potmeter mounted in series with the 6.8 Kohm resistor. When the potmeter is set at 0 you’ll have an original tone, and when turned up the mids increases and your amp growls with a British Vox’ish tone (especially together with a Celestion speaker). For a wider tone range you can replace the 6.8 KOhm resistor with a 4 KOhm, and use the 10 K pot to go beyond the original 6.8 KOhm and up to 14 KOhm. One can install the mid pot at the left most side of back of the amp where the additional power supply is located.

